Pages

Showing posts with label chapter 8. Show all posts

Monday, July 18, 2016

Plastic bonding - chapter 8

This chapter looked at making material surfaces by bonding plastic together, so I collected various plastic bags in preparation  It has to be said that in Sydney the selection is not great as admirably the stores are cutting back on plastic wastage and often provide paper or "decomposable" plastic bags which don't bond as well I find.  I had to resort to using bags I acquired in the UK recently or decorating grey or white bags.
Various fusing ideas tried using the heat of an iron under baking paper.  These samples are all about A4 page size unless otherwise stated:
8.1: Bonded cut plastic bag pieces
8.2: Trapping strips of white bag plastic with a thin freezer bag, machine stitching randomly then bonding under iron heat, while stretching to create holes

8.3: Knitted strips of freezer bag, threading strips of thicker bag plastic through knitting, then fusing under iron.

8.4: Knitting freezer bag strips as above then threading yarn and fabric strips before fusing
8.5: Torn used teabags wrapped in freezer bag strips, overlapped and then fused (approx A6 size)

8.6: Machine stitching in white on green garden bag, fused lightly, then crushed and refused so that areas of stitching disappear in the folds.  Once fused flat, the stitching looks broken and sporadic 
8.7: Strips cut from 8.6 above and re-fused onto another contrasting plastic collage background.  After fusing further bobbin stitching in white Perle 5 thread.
8.8: Shapes cut from collage fused plastic and fused on to garden plastic background.  Lines of green machine stitching and white bobbin stitching to integrate
8.9: Remaining negative collaged plastic after shapes cut out for 8.8, fused on to a new dark background.
Satin stitched bars sewn in white and yellow after fusing to echo the markings on plastic
8.10: detail of 8.9
 My resolved samples referenced designs made in here in chapter 4.  However I made some changes to those in designs 4.17-4.21 to integrate the applied shapes a little more in to the background:

8.11:  design on recycled black paper with monoprinting and applied torn motifs.  The motifs have been rubbed over with oil pastel to integrate them with the background.
8.12:  the resolved sample from design in 8.11 using fused monoprinted plastic, fused sheers on top and surface bobbin stitching to emphasize the shapes.
I did a second resolved sample (8.14) based on the design in 8.13 below:

8.13: monoprinting on recycled black paper with applied torn motif
8.14: the resolved sample from design in 8.13 using fused monoprinted plastic, fused sheers on top and surface bobbin stitching to emphasize the shapes.
8.15: detail of 8.14 sample above
Although cutting and stitching plastics didn't really appeal to me, I did enjoy the effect created by fusing pieces into one layer, losing edges and creating a new 'cloth'.


Sunday, June 15, 2014

Lacy paper frames

This section of work looked at creating contemporary lace effects using stitch with handmade paper and wirework.  Initial frames, approx. 25cm square, were made square using 1.25mm wire, then wrapped and tied with various fibres eg. perle 5 cotton, thicker jute string, thin strips of muslin.
These frames were then dipped in white paper pulp, pressed and left to dry completely.

8.1: Example of
I then stitched back into the frames using hand and machine stitch trying to make connections with the original lace patterns found in Reticella and Punto in Aria.

8.2: grid stitching across voids with couched perle
8.3: further threads wrapped over paper then drawn together using free zig-zag to create 'branches' of varying thicknesses
8.4: detail of 8.3
The additional stitching in 8.5 below was done by hand to simulate the woven bars and grid patterns used in Reticella lace.  The handstitches used were twisted lattice stitch (top left in photo 8.5), knotted buttonhole filling stitch (middle) and cretan open filling stitch (right and bottom)

8.5: handstitched "lace"

Having read Sian's work in"Approaches to Stitch"only recently I decided to make some wire bottles in a similar fashion. My bottles were pharmaceutical based for reasons which will come later in another chapter.  The wire was thinner this time (0.9mm) to bend more easily but still retain a firm shape and  I wrapped the wire with masking tape to enable the paper pulp to better stick to the outline,

8.6: wrapped wire bottles
8.7: after dipping in paper pulp and drying
then painted them with acrylics

8.8: bottle wire frames painted and further stitched into

I turned back to my research theme and created some wire frames in the shape of the floral motif used in earlier chapters of this module.

8.9: floral wireforms (top left one had windings of muslin strips which account for the greater paper pulp trapped
These reminded me of brittle leaves and might be something I'll take forward into designs for the final assessment piece.  But back to my bottles for the next design part..

Sunday, January 20, 2013

Digital image slips - ch 8

This part of the module gave me a choice of looking into shibori techniques or using digital prints in slip design.  I've done quite a bit of shibori dyeing in the past and have tended to avoid using digital prints in my work so thought I'd take the challenge now to persevere with digital printing a little more.  My lack of enthusiasm has arisen from many, many disasters combining fabric and my printer in the past so I did a bit more research, took a few more recommendations to heart and tested things with a lot of trepidation.  To cut a long story short I would definitely recommend the following:
  • carrier paper / sheet for fabric - use a complete A4 label peeled off its backing.  This is so much better than spray glue, glue sticks, freezer paper, and once the fabric is removed the label has sufficient stickiness to be used several times again.
  • if you can, use pigment inks in your inkjet printer.  After wrecking my previous printer with jammed paper, threads etc I bought a pretty cheap Epson printer just for such a purpose.  A papermaker and bookbinding friend recommended that I use Epson's pigment inks instead of 'normal' ones as she found they would could be 'set' with heat into fabric directly, so much easier than pretreating fabric.  I've since found that the digital prints I made using these inks directly onto untreated fabric are just as good as those onto fabric pretreated eg. with Ink Aid or Bubblejet Set, and don't wash off either. Of course this may be different for other printers but I'm glad I've found a method that works for me.
8.1
8.1 The image on the left was printed on silk organza pretreated with Ink Aid: the one on the right on untreated organza.  The left image is brighter I think but the right one is stronger.

To demonstrate the techniques tried and those that I prefer I made a few samples (all about A4 size):

8.2
The background in 8.2 is a posterized digital print of a magnolia leaves transferred from TTP (T-shirt transfer paper) on to pelmet vilene texturised with stuck threads, scrim fragments.  I thought that the texture would show through the transferred print but this was not very successful; I just lost fragments of the print in the roughness.
The slips on the far left are cut from magnolia image directly printed on to cotton fabric, adhered to dyed  hessian fragments. These slips and 2 slips from previous work are attached to the background under couched threads pulled from the hessian.

8.3
8.3: Images of my drawings in a previous post were printed directly onto cotton (coloured image) and cut into strips, and on silk organza (larger b/w drawing).  These have layered onto a monoprinted background with 2 non-digital slips.

8.4
8.4: Again a rather subtle sample using printed organza over printed dyed cotton.
A large image of one of my drawings is printed directly on to dyed cotton, 3 slip shapes cut out then ironed onto white cotton backing.  The top layer of organza was printed directly with several scattered images of my drawings.  The organza also has a larger slip shape cut out (left of middle) echoing the drooping leaf beneath.

8.5
As you can tell I'm particularly interested in digitally printing on organza - love the shadow effects.

8.5 uses the leaf image in 8.2 background printed both on organza (in strips layered over my printed bleach drawings) and printed on to silk chiffon (used to create wired 3D slips).  The curvy shape of the slips is echoed in the rippling cabling stitching attaching the strips.

8.6
Although I had decided to miss the shibori option I took one of the magnolia photo images directly printed on silk organza and tied ceramic baking beans in a Mokume shibori pattern to create a raised form of slip.  The silk organza was steamed for 20-30minutes then allowed to cool and completely dry overnight before the beans were removed.

8.7
8.7 The shibori silk was attached to a posterized image of a magnolia flower printed directly onto cotton lawn.  Free machining echoed the lines of the print and the bubbles of the shibori.


Wednesday, January 25, 2012

Textile translation

Fo my 100th post I've translated one of my "off the edge" designs into fabric.
I chose this one

and translated it (loosely) into this

8.24
 I actually started off looking at my monoprinted designs which appeared more translucent with the plan of using layered organzas and embroidered flounces, but the created edge felt too different from the original cotton fabric.  I opted for a heavier faced edging in the end.

For those interested I took some photos of the process I used to achieve this look.

8.25
 The original fabric was extended by applique onto a piece of pale yellow linen

8.26
 I created some areas of background circle decoration (that came from a couple of the other designs) but embellishing pink optim roving through from the reverse and free embroidering in circles from the front.

8.27
 The 'flower' shapes were added and attached using fine zigzag around the edges.  Stripes added using cabling from the underside in perle 5 thread.

8.28
 I extended the cabling stripes into the original fabric to integrate them a little more.

8.28 detail
 A close up of the embellished background.

8.29
 The shaped edge was faced with another piece of linen, and turned right side out.

8.30
 Ribbons of petals were added on top to give further depth to the textile and for this I used sheers and silks.  The edges were roll overlocked and also cable stitch embroidered.  I wanted the ribbons to be subtle and not obscure the flowers too much.

8.31
The ribbons are only attached in certain areas to allow them to curl naturally as they fall.


The finished edge is about 40cm wide by 30cm deep.

Saturday, January 21, 2012

Edging along

I've been looking at creating samples of decorative edges using different techniques - can't promise innovation but hopefully not boredom.  These samples are subdivided into technique categories but as usual there will be a bit of overlap.  Once I started on this I realised that, aside from samples getting easily lost, they needed to be presented together in some format so I have 'bound' them staggered in a kind of cloth reference book of edges.  I'll post photos of them together later but for now each sample is generally photographed separately.

Turned Edges

8.6
8.6   The edge material has been pin tucked on the diagonal then turned up and 3 channels filled with braided cord.  The loose ends have been knotted.


8.7
8.7  Wide turn-up created, numerous staggered buttonholes made then felted cords run through them.


8.8
8.8  Diamond shapes sewn in satin stitch, interior cut out then fabric turned up to reveal interesting gaps.  A braided cord runs through this channel.

8.9
8.9  Cut out strip of decorated felt attached to fabric edge, turned up and held in place with a gold cord passed through tabs and looped around the cut strip.  I've added the scissors into the photo to show where the turn-up is.

Bound edges

These 3 samples are shown on the same photo 8.10 with photo 8.11 showing the reverse side of the bound edge matching the front side.
8.10

8.11
8.12
In the bottom sample, the raw edge is hemmed with decorative fly stitch and turned edge bound with felt braids passed through buttonholes. 
In the middle the raw edge is wrapped in a freemachine sewn grid (8.12), held in place with braid tabs. 
In the top edge the raw edge was wrapped in chiffon, pattern sewn by free machine (resembling some of the petal design features on the last post) then cut away by soldering on both sides.


Faced edges
8.13
8.13  A shaped edge was created in the black fabric using a turned seam then wet felted leaves free embroidered and added on top.


8.14

8.15

8.16
 8.14  These 'drips' came from drawings/prints of large folded leaves in my sketchbook from Module 1 (shown in 8.16).  Thin fabric shapes and thick felt shapes were caught in the lower seam of the facing before turning right side out.  Another chiffon version of the shape was satin edged and caught in a second fold above that to overlap.


Frayed edges
8.15
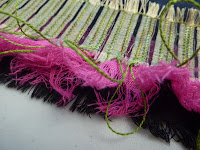
8.15  This sample has a black cotton backing with frayed edge with pink frayed muslin gathered and folded to resemble the fluted tops to the "orchid" flowers of the original inspiring fabric.  The olive silk dupion was frayed to exploit the 'shot' nature of the fabric and reveal a stripe pattern (as in the original).  Cabling with green perle emphasised the stripes


8.16
8.16  This sample similarly looks to the stripes for inspiration and uses frayed black hessian, frayed dyed muslin threaded and knotted through the hessian, and paper beads hanging on the 'tassels' created from the hessian.


Ruffles
Various ruffles were made from bias strips of poly chiffon.  I overlocked the edges to give some firmness.

8.17
 8.17  Bottom - simple even ruffle gathered along one side and inserted into edge facing.  Middle - wider ruffle gather off centre line, folded and stitched down along fold to give a tiered ruffle. Top - ruffle increasing in size l to r.

Flounces
Flounces are cut from circular shapes to give fullness without gathering at the sewn edge.

8.18
8.18  These flounces were cut from 3/4 of circles of cotton with internal circumference approx. 22cm, external circum 44cm.  The flounces differed only in the position of the internal circle for cutting (see diagram beside each flounce).  The length of the internal circle circumference and therefore the length of the seam was the same in each case.  The bottom flounce was set into the facing hem while the others were each sewn into a horizontal pleat in the green fabric.


8.19

8.19  Flounce in chiffon made from 2 complete circles set into a vertical seam.  I think this might be useful in my later interpretation of one of the fabric pattern designs for the orchid-like flowers.

Stitched edges
 
8.20

detail
8.20   This edge was created on water soluble fabric using an automatic stitch pattern repeatedly to buildup the lace then a perle 8 thread couched over lace and fabric.
 
8.21
 8.21  Leaf shapes free machined towards edge of chiffon. Edge of shapes and some internal areas removed with soldering iron.  Lace leaves sewn by free machining, attached to this edge using watersoluble fabric.

8.22
 8.22  To create a folded lace edge, free machining and cabling done in spirals between two edges of chiffon over water soluble fabric.  Once dissolved away, the new lace was folded to create the new edge (8.23).

8.23