Pages

Wednesday, July 20, 2016

And finally the totem.....

I liked the design of my totem silhouette piece in 10.4 but wanted the colours to be more akin to the Aboriginal research of my module so I used a cream woven linen as the background and bonded cut chiffons and organzas on to that.  It measured 20cm by 45cm and was backed by bonding to a stiff batting 2mm thick to support its own weight.

10.8:  Totem background of linen weave with bonded sheer fabric shapes
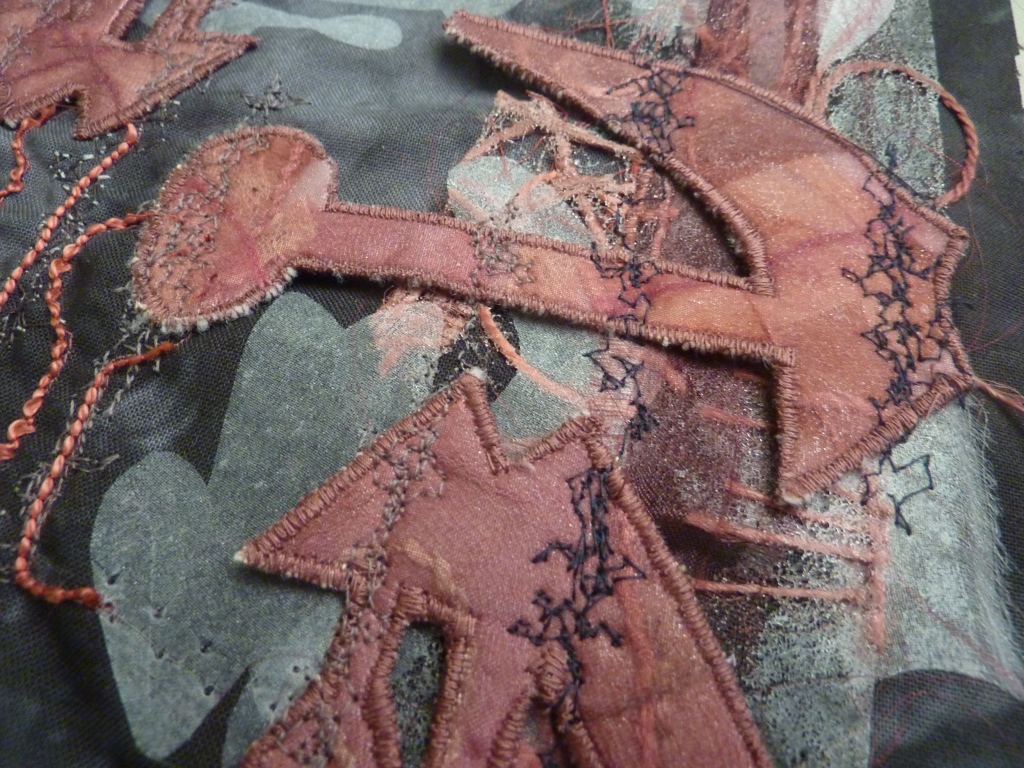
I then free machined seed stitching in white to emphasise the edges

10.9: Totem background of linen weave with bonded sheer fabric shapes and free machining
I wanted to add dimensional shapes to the background similarly to those in 10.7 where thick batting was sandwiched between fabric on either side by bonding.  The fabric here was recycled teabags and yarn covered by sheer organzas - white on one side and back on the other.  I wanted the shapes to be reversible.
I simplified the motif slightly, edged them with machine stitching and wrapped each with linen twine to recreate Aboriginal stripe markings.  Each shape is approx 8cm by 6cm.

As this was my last practical piece for the diploma (sob!) I felt this totem should be a retrospective of my work in the 6 modules so each shape has hanging detail representative of a particular module:

10.10a:  totem motifs (l to r) gumnut and bark - Vegetation theme research in Module 1,
coiled metal wire bead -  Metal in Module 2,
folded braiding - Strapwork in Module 3
10.10b: totem motifs  (l to r) cardboard motif - Slipwork in Module 4,
laminated lace - Transparentcy and lace in Module 5,
shrunck plastic gumnut - recycled materials in Module 6
Each shape had a 'hook' in the outline to enable it to remain attached to the background when inserted through a cut slit (like a self supported hanging shelf).

The background was formed into a tube and the whole totem can be seen in 10.11 with the shapes attached.

10.12  Totem resolved
Some other shots of the tubular totem -

10.13
10.14
10.15  Back of the totem showing reverse of the shapes
I also rather liked the totem flattened out as a wall piece (10.16), since the motifs still protrude slightly into the room at an angle and the background pattern is more apparent.

10.16
10.17
10.18
10.19


Resolved bonding

After the experimentation of the last chapter using fusible webbing I looked back at my totem designs with a view to developing them in fabric using bonding techniques.
I had tried to create a totem by hanging gumnut shapes but the individual shapes were rather indisinct.
I tried to resolve this by giving each shape a discrete border but didn't seem to help.  I preferred the silhouette and so developed this as a stencil.
Stacking vertical slices of this produced an interesting pattern that could be used in the future.
10.1 totem design
 This design was my inspiration for the two samples (A4 size in 10.2 and 10.4)) to follow.

10.2  Scraps of typed paper and cut threads, fibres were bonded on to white interfacing, and a white sheer bonded on top.  The totem silhouettes were cut from this sandwich and placed on dyed black cloth.  Strips of white, red and green sheer were stitched on top then heat gunned back.
Further whip stitch on top to integrate.
10.3  Close-up of above
I liked the texture created here but not a good representation of the design.
My second sample was simpler but more effective I felt

10.4: Silhouettes cut from white and red sheer organzas and bonded on to background.  Free motion embroidery on top to define the edges and add to tonal shading
10.5: Close up of above 10.4
 For my last resolved sample I went back to the design edited in 8.11.

10.6: On background - bonded shapes cut from white sheer organza, and cut strips of fusible web sandwich of red fibres.  Bobbin cording in red to highlight large shapes.  Pink shapes were cut from bonded sandwich of batting, scraps and red chiffon, edge finished and lightly bonded to background.
Free machine stitching in grey and black over dimensional shapes to integrate them.  Whipstitch on background to give speckled white marking of monoprinting.
10.7 Close-up of 10.6 above


Tuesday, July 19, 2016

Bonded layers - chapter 9

This chapter's experimentation and samples centred around using bonding transfer adhesives (eg Vliesofix, Bondaweb etc the name depending on where you are in the world) and bonding powder to layer up translucent and lacy sheer fabrics in interesting ways.

With my Australian ethnic research of this module in mind I prepared some unconventional 'fabrics' by bonding fibrous scraps to Vliesofix sheets (approx A4 size)

9.1: Scraps of dyed hessian on one layer of web
9.2 Yarn scraps on one layer of web
9.3: Torn used teabags and crushed egg shells between 2 layers of web
9.4: scraps of muslin and raffia strips between 2 layers of web
These were then torn / cut up and bonded onto new backgrounds with further stitching to create samples related to my previous research eg 4.22 and 4.23

9.5: Wide strips cut from 9.1 bonded on to  permanganate dyed cotton background.  Covered with red sheer, bonded, zapped with heat gun, then stitched in black couching cords
9.6: Close up of 9.5
9.7: Lines of stitching made on black sheer covering yellow background then burned back with heat gun.  Squares of 'fabric' (in 9.3) using teabags and eggshells cut and bonded then shape emphasised with surface stitching

9.8: Close up of 9.7
9.9: Torn pieces of webbing 'fabric' from both 9.2 and 9.4 were bonded onto a cotton backing.  Strips of Tyvek which had been rusted  were stitched down and distorted using a heat gun to resemble curling bark
9.10: Close-up of 9.9 above

Monday, July 18, 2016

Plastic bonding - chapter 8

This chapter looked at making material surfaces by bonding plastic together, so I collected various plastic bags in preparation  It has to be said that in Sydney the selection is not great as admirably the stores are cutting back on plastic wastage and often provide paper or "decomposable" plastic bags which don't bond as well I find.  I had to resort to using bags I acquired in the UK recently or decorating grey or white bags.
Various fusing ideas tried using the heat of an iron under baking paper.  These samples are all about A4 page size unless otherwise stated:
8.1: Bonded cut plastic bag pieces
8.2: Trapping strips of white bag plastic with a thin freezer bag, machine stitching randomly then bonding under iron heat, while stretching to create holes

8.3: Knitted strips of freezer bag, threading strips of thicker bag plastic through knitting, then fusing under iron.

8.4: Knitting freezer bag strips as above then threading yarn and fabric strips before fusing
8.5: Torn used teabags wrapped in freezer bag strips, overlapped and then fused (approx A6 size)

8.6: Machine stitching in white on green garden bag, fused lightly, then crushed and refused so that areas of stitching disappear in the folds.  Once fused flat, the stitching looks broken and sporadic 
8.7: Strips cut from 8.6 above and re-fused onto another contrasting plastic collage background.  After fusing further bobbin stitching in white Perle 5 thread.
8.8: Shapes cut from collage fused plastic and fused on to garden plastic background.  Lines of green machine stitching and white bobbin stitching to integrate
8.9: Remaining negative collaged plastic after shapes cut out for 8.8, fused on to a new dark background.
Satin stitched bars sewn in white and yellow after fusing to echo the markings on plastic
8.10: detail of 8.9
 My resolved samples referenced designs made in here in chapter 4.  However I made some changes to those in designs 4.17-4.21 to integrate the applied shapes a little more in to the background:

8.11:  design on recycled black paper with monoprinting and applied torn motifs.  The motifs have been rubbed over with oil pastel to integrate them with the background.
8.12:  the resolved sample from design in 8.11 using fused monoprinted plastic, fused sheers on top and surface bobbin stitching to emphasize the shapes.
I did a second resolved sample (8.14) based on the design in 8.13 below:

8.13: monoprinting on recycled black paper with applied torn motif
8.14: the resolved sample from design in 8.13 using fused monoprinted plastic, fused sheers on top and surface bobbin stitching to emphasize the shapes.
8.15: detail of 8.14 sample above
Although cutting and stitching plastics didn't really appeal to me, I did enjoy the effect created by fusing pieces into one layer, losing edges and creating a new 'cloth'.