Pages

Monday, December 12, 2016

Chapter 12 - Written illustrated essay

And finally, drum roll please....
Here is the final chapter to Module 6 and the last posting of my Diploma


Stitch: functional or decorative?

Stitch in textile art – is it functional to the physical integrity of the artwork, or purely decorative and thereby the definer of artistic quality?
It is not a question I had generally considered when viewing textile art; after all it is not something that comes to mind looking at gallery paintings or ceramics.  The paint strokes clearly do not hold the painting together or the glazes the clay, and yet they impart a texture, a movement and an aesthetic to the work that is present in many beautiful weavings borne out of functional stitches.

The weaving and coiling of Indigenous Australian artists researched during my last diploma module of work are clearly functional in their creation of vessels from grasses, but also highly decorative in stitch technique and adornment. (Figure 1)

Figure 1: Fibre sculpture detail by APY* artists

This fibre art enables the artists to express their culture and interest in their local habitat in the form of highly tactile sculptures.  They have a drive to create in this way, and a desire to continue the creation by passing on traditional skills to the next generation.  This passion led me to think of three British textile artists whose works exude their enthusiasm for stitch and inspire me to express myself in textiles: Jan Beaney, Sue Hotchkis and Alice Kettle.

Jan Beaney is a renowned embroiderer, teacher, author and exhibitor in the UK and worldwide.  She can employ mixed media, paint, beading and other contemporary materials into her work as the subject demands, but always with hand and machine embroidery as the principal players.  Like the Indigenous artists, she finds inspiration in the landscape around her and beauty in the mundane and everyday details.  The focus of indigenous art is often the locale and activities surrounding the artists.  Their fibre sculptures may be simplified to the point of schematic but the source of their design lies in local wildlife and vegetation.  Jan may not be using tangible vegetation in her work but her design sources lie similarly close at hand.
Over recent years she has used a water-soluble material on which to stitch, connecting fragments such as fabric scraps and wool roving through hand and machine stitch.  Once the fabric is washed away a complete new “cloth” remains on which further stitching can be done.   This is clearly a situation where stitch is both functional to the created cloth and decorative.  The combination of hand and free machine stitch gives a wonderful texture and depth to the work.  Hand embroidery in various weights of thread and wool, and in different type and size gives tremendous detail in layers of stitching.  Free machine embroidery then integrates and embeds the stitches, blending colour and its movement within the piece.
Whether her work is densely layered (Figure 2) or translucent to the point of extreme fragility (Figure 3), the compositional thought involved and skilled execution is always there and entices one to look ever closer.

Figure 2: New Life (2008) Jan Beaney, private collection

Figure 3: Skala Eressos – Early Evening (2009) Jan Beaney from scan of postcard

I love the way Jan blends and layers large bold hand stitches in thick wools with fragments of scrim material and wool roving (Figures 4 and 5).  It appears too great a contrast up close but simply gives enough texture interest when one steps back.  I have learned from this to continually stop and view ones work from a distance.  Fresh eyes from a different perspective are the key to self-critiquing.
.

Figure 4: New Life detail


Figure 5: New Life detail


It is the wish to entice the audience to look closer that I also endeavour to reach, and therefore it is not surprising that her use of hand and machine embroidery has 
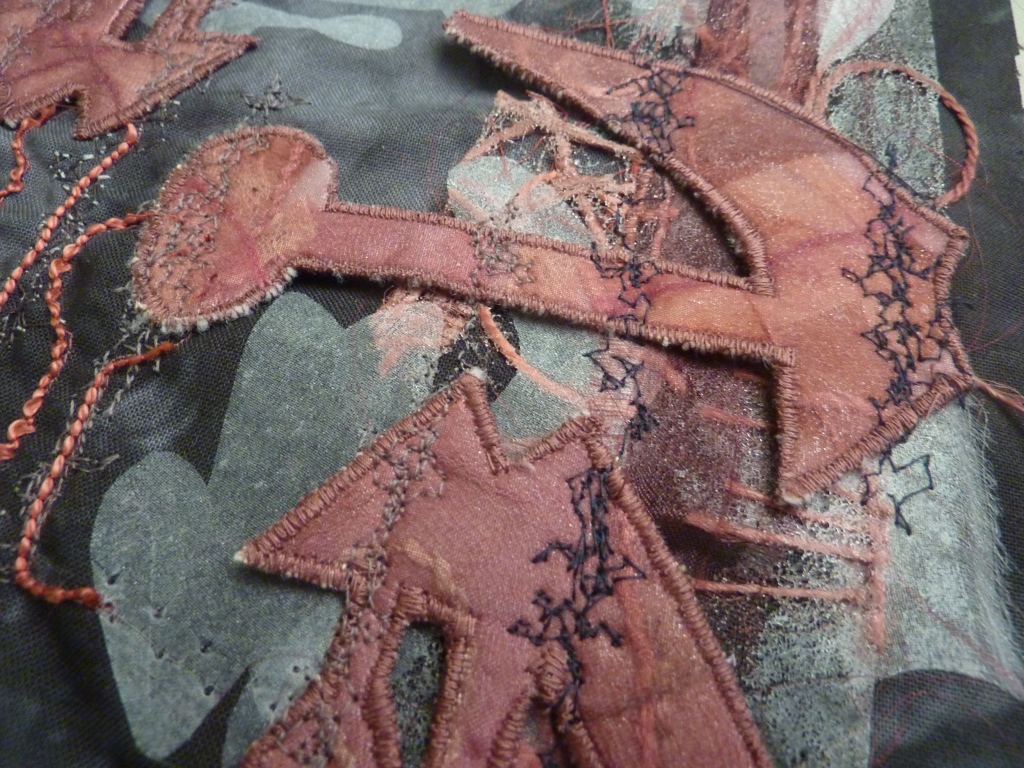
been influential in my work.  In Lichen, I sought to bring detail and texture to dimensional nunofelting with significant hand embroidery in different weights of wool and pearlised cotton (Figure 6).


Figure 6: Lichen detail (2016) Helen MacRitchie

In researching Lichen I came across a recent textile of the same name by Sue Hotchkis, a UK artist now living in Guernsey.  I had seen glimpses of her work over the last few years, glimpses of amazing layered texture, freely embroidered but only this year had the opportunity to discuss her work with her, first hand, while she was solo exhibiting in Fragments in Australia. 

She too is drawn visually to the details of living, drawn to photograph the torn posters, the rust and wear, the detritus of modern life. She sees beauty in the detail that is often missed on first glance.   Her inspiration and subject matter may be far from exciting in name but once they abstractly transform into such jewelled fragments of stitched detail, they come alive.
She employs digital printing, screen printing, paper lamination, trapunto, free machine embroidery to name but a few contemporary techniques, building and disintegrating layers and fragments (as her exhibition was so aptly named) into detailed sculptural hangings (Figures 7 and 8)

Figure 7: Door detail Sue Hotchkis 
Figure 8: Fifty-two detail Sue Hotchkis

Her stitching is functional, combining layers and fragments into a cohesive hanging, but of course it is also highly decorative.
  Without her extensive embroidery much surface detail and sculptural manipulation would be lost and the fragment cohesion diminished.

She describes her stitching process as meditative. She becomes almost lost in the rhythm of machine stitching, merging fragments and creating texture, reminding me of the repetitive weaving involved in Indigenous fibre art.  Such dedication to the process is apparent; never invisible to the close examiner.  I also see the employment of new technologies such as digital printing which are at hand to the contemporary textile artist, an extension to the materials at hand to the Indigenous artist.  The techniques may have changed but the opportunistic approach to available resources has not.  I love her striking use of colour, particularly her combinations of complementary colours as in Verdigris (Figure 9), and the tonal variations within pieces, such as Embrace (Figures 10 and 11), giving them real depth.

Figure 9:  Verdigris detail Sue Hotchkis 
Figure 10: Embrace detail Sue Hotchkis
      
Figure 11:  Embrace Sue Hotchkis
In the past Sue had tried to make her work conform to perceived standards of hangings, e.g. straight-edged and two dimensional, but her recent organically shaped and distinctly sculptural pieces give her freedom and pleasure. They evolve during their creation and have a life of their own. Her adherence to perceived guidelines resonated with my own reluctance to contain the organic nature of wool felting and to embrace the artistically sculptural nature of that material as in Loedhas (Figure 12).  I applaud Sue’s mantra of being true to herself, confident in her own work and in her art practice while striving to develop further.  
 Figure 12: Loedhas Helen MacRitchie

Another UK textile artist who has found her own medium in which to express her art practice is Alice Kettle.  Alice is currently Professor in Textile Arts at Manchester Metropolitan University having studied fine art as an undergraduate working in abstract expressionism, and then pursuing textile art as a postgraduate.  She has established a unique position in the fibre arts field creating heavily stitched wall hangings, using extensive free machine embroidery and layering threads of different weights and thicknesses on a cloth background.   She often chooses as inspiring subject matter, historical characters and tales, mythological stories, and figurative representations.  In her pictorial pieces, there is rarely a literal connection to her theme, more often a symbolic one.  This is reminiscent of the markings found in Indigenous art e.g. circles representing homesteads or gatherings, meandering lines as rivers, movement or animals. Their culturally important people and story creatures are represented symbolically in their fibre sculptures.   In Alice Kyteler (Figure 13) the central figure may indeed be the old woman of that name but Alice gives her a sense of regal majesty inferring her power and strength of character through the adornment of her skirt in textile ephemera and her compositional placing in lightness with metallic threads.

Figure 13:  Alice Kyteler Alice Kettle, photo taken from www.alicekettle.com

I briefly studied Alice in a previous module of diploma work, but since then I have examined some of her commissioned installations more closely and had the opportunity to hear her speak in conference about her work.  I did not fully appreciate before her painterly approach to her work. She expresses her love of the physical nature of paint, the gestural nature of mark making, and her desire to translate her fingerprint in painting into textiles.  She layers threads in her stitching to convey the fluidity of painting strokes, playing with threads of different colour, thickness and shine.  Different qualities in light reflection are achieved by layering glossy and matt threads, which let the viewer “go into” the surface of the threads.  She tries to “float” a matt thread over areas of metallic to give depth and alter the light resonance between threads.  I am fortunate enough to own a textile Daniel and the Lioness (Figure 14), by Alice Kettle, and can appreciate this effect at first hand – aspects of the surface appear differently coloured and reflected as you move past in different light. 


Figure 14:  Daniel and the Lioness Alice Kettle, private collection

Threads are layered in different directions (Figure 15), some stitches tiny others huge, whipstitching colours from beneath appear (Figure 16), and loops of thread jump off the surface (Figures 17 and 18).

Figure 15:  Daniel and the Lioness detail 1 Alice Kettle

Figure 16:  Daniel and the Lioness detail 2 Alice Kettle

Figure 17:  Daniel and the Lioness detail 3 Alice Kettle
 Figure 18:  Daniel and the Lioness detail 4 Alice Kettle
The fascinating detail is there on close examination but the joy is apparent when you step back.  It then becomes less about the individual stitches and more about the movement and light conveyed across the whole textile.  It could be said that each stitch is decorative but I feel they are not to be admired in isolation – rather they exist ‘en masse’, creating a fluidity of colour and gesture true to Alice Kettle.  In that sense they are indeed functional, and successful in achieving that goal.

Mark making through stitch takes many forms: functional and decorative. My study of these three artists for whom mark making has great affinity, has shown me that be it in the creation of soft textural colour blends, the effect of abstract paint strokes, or organic sculptural detail, stitched textiles are a feast for the eyes and an inspiration to us all.


Helen MacRitchie 2016

All photographs are my own except where noted.

*APY: Anangu Pitjantjatjara Yankunyjatjara

References:

Jan Beaney and Jean Littlejohn (2010) Stitchscapes, published by Double-Trouble, UK
Jan Beaney and Jean Littlejohn (1998) Stitch Magic: Ideas and Interpretation, published by Batsford, UK
BeCreative with Workbox magazine (2015), May/June
Embellish magazine (2016) Vol 25 March
Embroidery magazine (2016), Jan/Feb issue, Craft, Credo & Collaboraton, pp28-33
Carol Shinn (2009), Freestyle Machine Embroidery, published by Interweave Press USA
Diana Springall (2005) Inspired to Stitch, published by A&C Black Publishers, UK

www.alicekettle.co.uk/exhibitions/narrative-line/
www.suehotchkis.com
www.textileartist.org/alice-kettle-reinvent-rework-reconstruct/
www.textileartist.org/jan-beaney-and-jean-littlejohn-interview
www.textileartist.org/susan-hotchkis-conception-creation/
www.vam.ac.uk/content/articles/i/interview-alice-kettle-embroiderer/


And the penultimate post......

Here for authentication purposes is me with various pieces completed in chapters 9 and 10 of Diploma Module 6.


Life after PAP4: Sterculia

The end is in sight as they say, so here are the details of self-assessment for my 4th Personal Assessment piece Sterculia completed about a year ago:

Evaluation:  The piece was hung from a clear perspex rod (10mm diam) so as to minimize the visual impact of a pole against the wall and not detract from the work.  The flexibility of the rod successfully enabled the piece to follow the curvature of the wall, and not impede the flow of traffic through that area.
The rod was attached to the wall using 3 clear "command" hooks and strips.

All my previous photography of the work was taken against a white backdrop so I was anxious to see how the piece appeared against this darker wall.  I acknowledge that the brown and green colours merge into the background a little more as I suspected they would, but the 'floral' motifs in yellow are now brighter and focal to the piece.  The fluorescent lighting adds to this.

Design changes?  I would like to pursue my idea to hang several overlapping layers distinctly apart but I think a site with an open void might have been better suited to that.  I could have gone bigger of course, making a feature of the curved wall and creating a hanging twice as wide, but overall I am pleased with the result.

Time taken to produce:  
  • to prepare and felt the final 2 layers of lace felt - 13 hours
  • to prepare the sheer and felted motifs with shisha mirrors - 9 hours
  • to attach and free machine embroider - 5 hours
total time - 27 hours

Cost to produce:
  • merino wool roving (approx 500g) - $4
  • landscape dyes (approx 10g) - $12
  • shisha mirrors - $8
  • polyester sheer fabric (approx 1m) - $10
  • wool yarns, crochet cottons - $7
  • embroidery thread, machine and hand - $12
  • perspex rod - $16
  • resist foam and plastic sheeting for felting - $3
total cost - $72
Methods and order of work:
  • dyeing of wool roving, wool yarns, cotton yarns
  • laying out dyed yarns and wool roving in lattice formation for felting
  • felting of lattice layers
  • felting shisha mirrors into wool, drying, cutting out paisley pattern motifs from felt and free machine embroidering
  • drawing out motifs on water soluble fabric, stitching motifs through sheers, dissolving fabric, drying then cutting out motifs using soldering iron.
  • attaching motifs to lattice by hand stitching
Particular health and safety issues:
  • acid dyes - powdered dye kept in sealed pots within sealed container out of reach of children in dedicated dyeing room.  Mask and gloves worn when measuring out into jar.  Care taken in adding hot water, making solution of dye.  Be aware of steam in urn when adding dye solution or wool roving / yarn.  All utensils used only for dyeing procedure.
  • felting - work on raised table to minimize strain on back, mop up any water spills on floor around working area
  • shisha mirror motifs - be aware of cut mirror edges within felt when free machining felt motifs, wear glasses for protection against broken needles
  • soldering iron - work in well ventilated room, preferably next to open window, leave hot iron held in upturned flower pot when not in use, always remember to pull out plug after use.
Since completing the work I have had the opportunity to exhibit it a couple of times - once at Craft NSW, Sydney (Oct 2015) and once as part of Out of Hand contemporary textile exhibition at Wallarobba Cultural Arts Centre, Hornsby (Nov 2015)as part of Untethered fibre artists. 
At the Craft NSW Gallery I was able to hang the piece on 2 perspex rods slightly staggered apart which was an interesting change.

Sterculia at Craft NSW, the Rocks, Sydney
 And at Wallarobba Cultural Arts Centre it was hung at the turn of the stairs up to more gallery rooms.  This allowed visitors had the opportunity to view it from the side as they passed by.

Sterculia, part of Out of Hand, at Wallarobba Cultural Arts Centre, Hornsby

Friday, December 9, 2016

Fibrecraft of Indigenous Australia

 In Australia and the Torres Strait Islands, the indigenous people have traditionally made objects with everyday functions using the materials to hand, recycled from animal and plant fibres such as tree bark, hair, palm fronds and grasses.  In combination, these natural fibres have created clothing, shelter, shades, fishing nets, sieves, canoe sails as well as bags and baskets.

String bags were made for food gathering, to carry and store food and personal items and tools.  They are often called Dilly bags, thought to originate from the Turrbal word dili but there are many other names given to them depending on their place of origin.  They are usually oval in shape, collapsible for ease of storage, with a twined string or cord for slinging around the carrier’s neck.  Grasses or roots are twined to make the string needed to stitch or weave the bag.  The bags are identifiable by the type of stitch used to make them, usually knots with or without loops or twists, to create an open structure of great strength.

1.1: Dilly bag made from grasses and kurrajong bark, maker unknown, acquired 1898, by Australian Museum Sydney
1.2: Detail of knotting in large string bag (Wurra-wurra) made from bark fibre cord, ochre pigment, maker unknown, acquired 1895 by Australian Museum, Sydney
The continuation of the craft technique through sharing and collaboration is very important in Australia, but with respect to the indigenous culture the teaching of Dilly bags generally remains with the indigenous people rather than the greater contemporary basket making community.

Baskets made by Aboriginal and Torres Strait Islander people are generally either woven or coiled.
In coiled baskets, a foundation coil is made from a bundle of flexible stick fibres or grasses, over which a working strand of fibre makes a series of buttonhole stitches to cover the bundle core.  This core is tightly coiled, spiralling outwards and upwards in the case of a basket, with the buttonhole stitches wrapping the bundle and occasionally catching the buttonhole stitch on the coil beneath.

1.3: A small coiled basket with handle made using Pandanus fibre from South Australia, maker unknown, acquired 1958 by Australian Museum
1.4: Coiled bag with purse lip opening, plant fibre, Victoria, maker unknown, acquired 1900 by Australian Museum
Woven baskets generally use a method called weft twining.  Here there are two elements: bundles of fibres or split leaves form the WARP, and 2 or sometimes 3 working fibre strands for the WEFT set interlacing and interlinking with the warp bundles.  Pandanus and palm fronds are incorporated in this way.  The pandanus plants are easily propagated and are resilient to adverse environmental conditions making them ideal for weaving purposes.
 
1.5: Bicornual basket (referring to the two horns on the lower corners) from split canes, southern rainforests of Queensland, maker unknown, acquired by Australian Museum, Sydney

1.6: Twined grass and Pandanus basket with ochres from Arnhem Land, Northern Territory, maker unknown, acquired by Australian Museum

1.7: detail of 1.6 above
Not all Aboriginal fibre work is for everyday use, of course.  The same techniques are used with natural fibres in elaborate ceremonial objects and for body adornment, often incorporating feathers, eg. parrot, lorikeet or emu feathers.  The finished articles can be beautifully painted with naturally occurring yellow and red ochre pigments.
 
1. 8:Ceremonial headdress made from paperbark and human-hair string and decorated with emu feathers and ochres (photo courtesy of the Powerhouse Museum, Sydney website
Armed with the experience and skill to make beautifully crafted functional items, many Aboriginal people have gone on to create more innovative sculptural fibre work through art movements established in the central desert regions such as Ernabella.

I was fortunate enough recently to view an exhibition in the Hazelhurst Regional Gallery and Arts Centre, given by the artists of the Anangu Pitjantjatjara Yankunyjatjara (APY) Lands of Central Australia.  The APY Lands are vast, covering over 10% of South Australia near the tri-state border with the Northern Territory and Western Australia.  The APY art movement originates from the art centre at Ernabella established in 1948, making it the oldest continuously running indigenous art centre in Australia.
The exhibition, entitled Nganampa Kililpil, brought together more than 100 artists from across the Lands, sharing unique cultural and artistic traditions.  One collaborative sculptural fibre art installation, Punu Kutjara (Two Trees), was created by 38 weavers and helpers and reflects the vast and abundant country through the depiction of two trees surrounded by many animals, birds and insects.  

1.9: Punu Kutjara (Two Trees) in Hazelhurst Gallery

1.10: One of the Trees from Punu Kutjara
The sculptures are prepared using traditional knotting, wrapping and weaving techniques with local grasses (Kutanu, wangunu and tjanpi) found in the local rockpools, creeks, gullies and claypans.  All these places are deemed sacred and life-giving to the Tjanpi weavers.  The weaving incorporates raffia and plastic string recycled from modern life bringing vibrancy and colour into the installation.

1.11: Detail of weaving in Punu Kutjara sculptural fibre animals

 1.12: Detail of weaving with raffia and plastic string in Punu Kutjara sculptural fibre animals
All the sculptures are models of ancestral spirits; every animal is a dreaming subject which lives on through the creativity of many generations of women.  In this way the desert women can express their cultural heritage in an artistic medium that suits their lifestyle.

All photos have been taken by me except 1.8.

References:

1.  Keller, Christine (2010) Craft and Design Inquiry, issue 2, From Baskets to Bodies: Innovation from Aboriginal Fibre Practice
2.  Nganampa Kililpil: Our Stars (2016) Hazelhurst Regional Gallery and Arts Centre, NSW, Australia
3.  Powerhouse Museum, Sydney, NSW
4.  Tjanpi Desert Weavers (2011), Macmillian Mini-art Series no.19, Macmillan Art Publishing, Australia

Wednesday, July 20, 2016

And finally the totem.....

I liked the design of my totem silhouette piece in 10.4 but wanted the colours to be more akin to the Aboriginal research of my module so I used a cream woven linen as the background and bonded cut chiffons and organzas on to that.  It measured 20cm by 45cm and was backed by bonding to a stiff batting 2mm thick to support its own weight.

10.8:  Totem background of linen weave with bonded sheer fabric shapes
I then free machined seed stitching in white to emphasise the edges

10.9: Totem background of linen weave with bonded sheer fabric shapes and free machining
I wanted to add dimensional shapes to the background similarly to those in 10.7 where thick batting was sandwiched between fabric on either side by bonding.  The fabric here was recycled teabags and yarn covered by sheer organzas - white on one side and back on the other.  I wanted the shapes to be reversible.
I simplified the motif slightly, edged them with machine stitching and wrapped each with linen twine to recreate Aboriginal stripe markings.  Each shape is approx 8cm by 6cm.

As this was my last practical piece for the diploma (sob!) I felt this totem should be a retrospective of my work in the 6 modules so each shape has hanging detail representative of a particular module:

10.10a:  totem motifs (l to r) gumnut and bark - Vegetation theme research in Module 1,
coiled metal wire bead -  Metal in Module 2,
folded braiding - Strapwork in Module 3
10.10b: totem motifs  (l to r) cardboard motif - Slipwork in Module 4,
laminated lace - Transparentcy and lace in Module 5,
shrunck plastic gumnut - recycled materials in Module 6
Each shape had a 'hook' in the outline to enable it to remain attached to the background when inserted through a cut slit (like a self supported hanging shelf).

The background was formed into a tube and the whole totem can be seen in 10.11 with the shapes attached.

10.12  Totem resolved
Some other shots of the tubular totem -

10.13
10.14
10.15  Back of the totem showing reverse of the shapes
I also rather liked the totem flattened out as a wall piece (10.16), since the motifs still protrude slightly into the room at an angle and the background pattern is more apparent.

10.16
10.17
10.18
10.19


Resolved bonding

After the experimentation of the last chapter using fusible webbing I looked back at my totem designs with a view to developing them in fabric using bonding techniques.
I had tried to create a totem by hanging gumnut shapes but the individual shapes were rather indisinct.
I tried to resolve this by giving each shape a discrete border but didn't seem to help.  I preferred the silhouette and so developed this as a stencil.
Stacking vertical slices of this produced an interesting pattern that could be used in the future.
10.1 totem design
 This design was my inspiration for the two samples (A4 size in 10.2 and 10.4)) to follow.

10.2  Scraps of typed paper and cut threads, fibres were bonded on to white interfacing, and a white sheer bonded on top.  The totem silhouettes were cut from this sandwich and placed on dyed black cloth.  Strips of white, red and green sheer were stitched on top then heat gunned back.
Further whip stitch on top to integrate.
10.3  Close-up of above
I liked the texture created here but not a good representation of the design.
My second sample was simpler but more effective I felt

10.4: Silhouettes cut from white and red sheer organzas and bonded on to background.  Free motion embroidery on top to define the edges and add to tonal shading
10.5: Close up of above 10.4
 For my last resolved sample I went back to the design edited in 8.11.

10.6: On background - bonded shapes cut from white sheer organza, and cut strips of fusible web sandwich of red fibres.  Bobbin cording in red to highlight large shapes.  Pink shapes were cut from bonded sandwich of batting, scraps and red chiffon, edge finished and lightly bonded to background.
Free machine stitching in grey and black over dimensional shapes to integrate them.  Whipstitch on background to give speckled white marking of monoprinting.
10.7 Close-up of 10.6 above