Pages

Wednesday, January 25, 2012

Textile translation

Fo my 100th post I've translated one of my "off the edge" designs into fabric.
I chose this one

and translated it (loosely) into this

8.24
 I actually started off looking at my monoprinted designs which appeared more translucent with the plan of using layered organzas and embroidered flounces, but the created edge felt too different from the original cotton fabric.  I opted for a heavier faced edging in the end.

For those interested I took some photos of the process I used to achieve this look.

8.25
 The original fabric was extended by applique onto a piece of pale yellow linen

8.26
 I created some areas of background circle decoration (that came from a couple of the other designs) but embellishing pink optim roving through from the reverse and free embroidering in circles from the front.

8.27
 The 'flower' shapes were added and attached using fine zigzag around the edges.  Stripes added using cabling from the underside in perle 5 thread.

8.28
 I extended the cabling stripes into the original fabric to integrate them a little more.

8.28 detail
 A close up of the embellished background.

8.29
 The shaped edge was faced with another piece of linen, and turned right side out.

8.30
 Ribbons of petals were added on top to give further depth to the textile and for this I used sheers and silks.  The edges were roll overlocked and also cable stitch embroidered.  I wanted the ribbons to be subtle and not obscure the flowers too much.

8.31
The ribbons are only attached in certain areas to allow them to curl naturally as they fall.


The finished edge is about 40cm wide by 30cm deep.

Saturday, January 21, 2012

Edging along

I've been looking at creating samples of decorative edges using different techniques - can't promise innovation but hopefully not boredom.  These samples are subdivided into technique categories but as usual there will be a bit of overlap.  Once I started on this I realised that, aside from samples getting easily lost, they needed to be presented together in some format so I have 'bound' them staggered in a kind of cloth reference book of edges.  I'll post photos of them together later but for now each sample is generally photographed separately.

Turned Edges

8.6
8.6   The edge material has been pin tucked on the diagonal then turned up and 3 channels filled with braided cord.  The loose ends have been knotted.


8.7
8.7  Wide turn-up created, numerous staggered buttonholes made then felted cords run through them.


8.8
8.8  Diamond shapes sewn in satin stitch, interior cut out then fabric turned up to reveal interesting gaps.  A braided cord runs through this channel.

8.9
8.9  Cut out strip of decorated felt attached to fabric edge, turned up and held in place with a gold cord passed through tabs and looped around the cut strip.  I've added the scissors into the photo to show where the turn-up is.

Bound edges

These 3 samples are shown on the same photo 8.10 with photo 8.11 showing the reverse side of the bound edge matching the front side.
8.10

8.11
8.12
In the bottom sample, the raw edge is hemmed with decorative fly stitch and turned edge bound with felt braids passed through buttonholes. 
In the middle the raw edge is wrapped in a freemachine sewn grid (8.12), held in place with braid tabs. 
In the top edge the raw edge was wrapped in chiffon, pattern sewn by free machine (resembling some of the petal design features on the last post) then cut away by soldering on both sides.


Faced edges
8.13
8.13  A shaped edge was created in the black fabric using a turned seam then wet felted leaves free embroidered and added on top.


8.14

8.15

8.16
 8.14  These 'drips' came from drawings/prints of large folded leaves in my sketchbook from Module 1 (shown in 8.16).  Thin fabric shapes and thick felt shapes were caught in the lower seam of the facing before turning right side out.  Another chiffon version of the shape was satin edged and caught in a second fold above that to overlap.


Frayed edges
8.15
8.15  This sample has a black cotton backing with frayed edge with pink frayed muslin gathered and folded to resemble the fluted tops to the "orchid" flowers of the original inspiring fabric.  The olive silk dupion was frayed to exploit the 'shot' nature of the fabric and reveal a stripe pattern (as in the original).  Cabling with green perle emphasised the stripes


8.16
8.16  This sample similarly looks to the stripes for inspiration and uses frayed black hessian, frayed dyed muslin threaded and knotted through the hessian, and paper beads hanging on the 'tassels' created from the hessian.


Ruffles
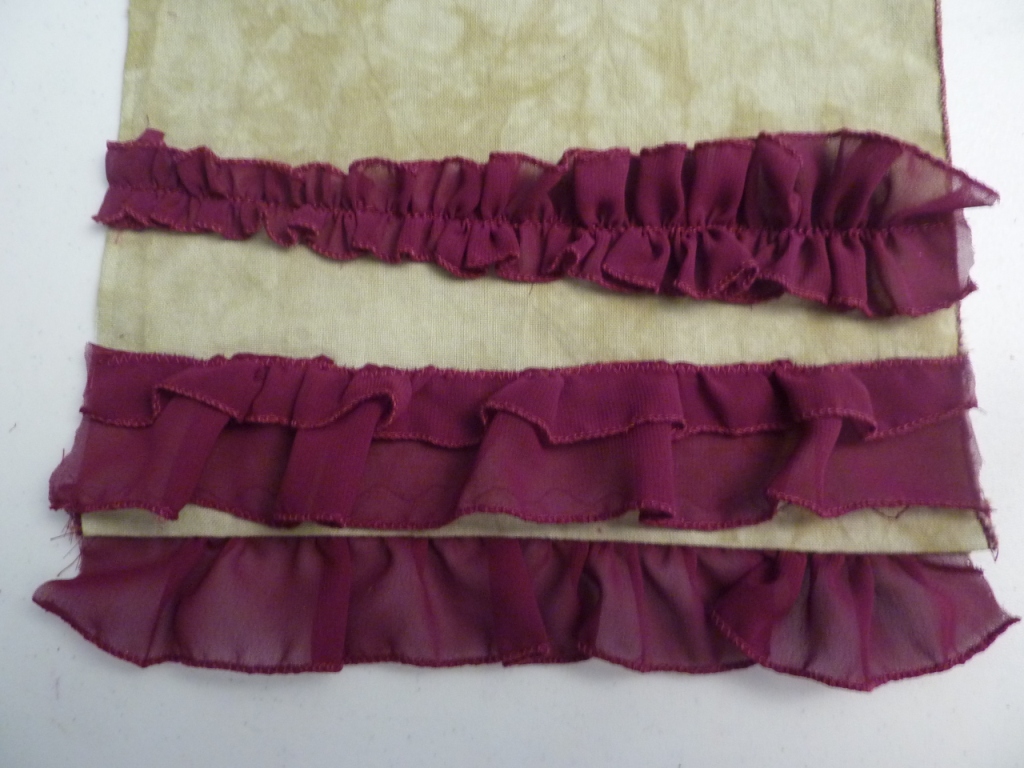
Various ruffles were made from bias strips of poly chiffon.  I overlocked the edges to give some firmness.

8.17
 8.17  Bottom - simple even ruffle gathered along one side and inserted into edge facing.  Middle - wider ruffle gather off centre line, folded and stitched down along fold to give a tiered ruffle. Top - ruffle increasing in size l to r.

Flounces
Flounces are cut from circular shapes to give fullness without gathering at the sewn edge.

8.18
8.18  These flounces were cut from 3/4 of circles of cotton with internal circumference approx. 22cm, external circum 44cm.  The flounces differed only in the position of the internal circle for cutting (see diagram beside each flounce).  The length of the internal circle circumference and therefore the length of the seam was the same in each case.  The bottom flounce was set into the facing hem while the others were each sewn into a horizontal pleat in the green fabric.


8.19

8.19  Flounce in chiffon made from 2 complete circles set into a vertical seam.  I think this might be useful in my later interpretation of one of the fabric pattern designs for the orchid-like flowers.

Stitched edges
 
8.20

detail
8.20   This edge was created on water soluble fabric using an automatic stitch pattern repeatedly to buildup the lace then a perle 8 thread couched over lace and fabric.
 
8.21
 8.21  Leaf shapes free machined towards edge of chiffon. Edge of shapes and some internal areas removed with soldering iron.  Lace leaves sewn by free machining, attached to this edge using watersoluble fabric.

8.22
 8.22  To create a folded lace edge, free machining and cabling done in spirals between two edges of chiffon over water soluble fabric.  Once dissolved away, the new lace was folded to create the new edge (8.23).

8.23


Tuesday, January 17, 2012

To the Edge

Section 1 of chapter 8 called for the selection of a printed / decorated fabric as inspiration to design "off the edge".  Selecting a suitable fabric I found the difficult bit as I don't tend to go for motifs and I wanted to challenge myself instead of plumping for my usual muted abstract shapes.
I eventually went for

since it definitely had strong shapes, a vegetation theme to it and....(I couldn't imagine actually using it in anything!)

I cut strips from it and played with designing off the edge onto A3 paper.

8.1
8.1 The first used oil pastels and watercolour pencils, and kept faithful to the original motifs.


8.2
8.2 The second in oil pastels, watercolour pencils and felt pen, used a simplistic form of the striped flowers and ribbon like petals.


8.3
8.3 Used the orchid-like flowers upside down with rubbings over sequin waste, and the veins of the leaves as an overlying pattern.


8.4
8.4 I decided to be a little more abstract with my patterns, rollering paint over leaf shaped stencils and sequin waste to build up colour then adding decorated paper cuttings for petal and stalk effects.


8.5
8.5 I built up a monoprint background with freehand drawn leaf shapes and stripes through the ink on the acetate sheet then added lines of dots and stylised petals with decorated papers.  I'm not sure where the edge of the fabric would lie but it does lend itself to fabric layering of elements if I were to translate this design into fabric.

Now back to some practical edge finishing samples for the next post...

Monday, January 9, 2012

Resolved knitting sample

The inspiration for my resolved sample came from a photo I took in the autumn out of my 'studio' window.  I can see one of the few deciduous trees in our garden from there, and in the autumn it was a gorgeous mass of red.

6.12
I aimed to create a sample that would give a sense of the colour arising from the volume/ bulk of leaves and variety of tone, using a multilayered 'fabric' of knitting elements.

6.13
I first knitted a piece with holes and elongated stitches (15 x 18cm) using plastic strips, then ironed it (6.13) and painted it with acrylics (6.14).

6.14
Small quantities of overlocked braided threads were prepared using combinations of red, green and fawn threads in needles and interlopers.  Some of these 'braids' were also created over a thicker core Perle thread (bottom left of 6.14).  A piece of knitting was made out of these threads.

6.15

6.16 (detail of 6.15)
Although the piece looked a bit like discarded seaweed there was a plan, really.  Since it was made with 3 longish disconnected 'fingers' of knitting, I could weave it out and in the plastic lattice.

6.17
 The piece lacked focus and green actually (although the photo does not do the actual colourings any justice either), so I treated some real leaves with polymer sealant and threaded them on to green perle 8 before attaching them by crochet chain stitching them in situ.

Et voila.... my resolved sample

6.18

6.19
( detail of 6.18)


Knitting samples galore

For chapter 6, I chose the knitting option A for my "constructed fabric" fun and played around with a few odd materials while trying to keep to my tree/ vegetation research theme.
Started with strips of muslin that I had dyed previously to get a handle on the size of knitting pins I'd need.
6.1

6.1 This was olive green but it hasn't come out in the photo.  Plain knitting, size 12 by 9cm. Roughly all the samples to follow are about 12x10cm at least.

6.2
 6.2 uses raffia, incorporating tiny gum nuts that were strung on green perle and knitted in along with the raffia - bit of a nightmare if truth be told since the raffia continually broke.  Detail is shown in 6.3

6.3

6.4

6.4 uses green jute gardening string, playing around here with holes and stretched elongated stitches.

6.5
6.5 is knitted up strips cut from black gardening matting (the kind that retards the growth of weeds through it, when in one piece, obviously).  I thought it amusing to tie bits of green hairy fibre through like weeds!

6.6

Since the matting was synthetic and looked a bit like Tyvek I ironed another piece of knitting to get this wonderfully lacey 2D piece.  Photo 6.6 shows the transparency of it held up to the light.

6.7

6.7 On the plastic-melting front I knitted up thin strips of transparent food bags then ironed the knitting to get a weblike structure that took acrylic paint well.

6.8
6.8 is a photo of a sample I did for a workshop I taught last year on contemporary lace structures, but I thought that it also fitted in here since it involves layers of painted melted knitted plastic bag strips then machine stitched with scrim and organza.  It's something I'll return to for the resolved sample in the next posting.

6.9
 I do prefer the finer knitting, so I went back to 2 ply crochet cotton in 6.9.  The top part of the sample uses the single yarn while for the lower half, I monkey chained the yarn before knitting.

6.10
 More laciness and holes in 6.10 (and detail in 6.11) using overlocked thread as the knitting yarn.  The bottom part is knitted from 3-5mm strips of organza with rolled overlocked edging which gives a nice shadowy effect I think.  The middle part uses a two thread wide overlock on the same organza, while the top uses the same wide overlock but no structure ie. threads only.  I particularly like the top part as the threads look like braids in their own right.

6.11
I felt that I could have made many samples with all the ideas I had on dyeing threads, completed knitting etc but stopped at this point to concentrate on my resolved sample which will appear in the next posting.