Pages

Showing posts with label design. Show all posts

Sunday, January 10, 2016

Totems

The design exercises of Chapter 5 concern totems.  Like other students before me, I looked into the definition to find a contemporary equivalent or twist I could use here

  • a natural object or an animate being, as an animal or bird, assumed as the emblem of a clan, family, or group.
  • a representation of such an object serving as the distinctive mark of the clan or group.
In this design context the totem should be representative of my personal research and development through this course so what better way or encompassing my work than to use the decorated papers, fibre materials and photos that I created during each module of the diploma. 
I chose to create a collection of gumnut motifs torn out from these papers as it was symbolistic of my overall vegetation theme and motif had been used in some form or another throughout the diploma eg Module 1 sketchbook, Module 3 strapwork and Module 4 3D shapes).

5.1: gumnut shapes torn from decorated papers monoprints and photos used during modules 1-5
I decided to arrange them threaded through 3 lengths of jute twine as I had made in previous chapters of this module, and hang them from a hook to photograph.
5.2: hanging 'totem' of gumnuts
Indigenous Australians were very much into the spiritualism surrounding totems particularly shown in representations of 'Dreamings" so I wanted to link my totem with something more indigenous.  I prepared an open net 'cloth' using the jute fibre with the intention of making a bag akin to a traditional dilly bag to hold and thereby "connect" the motifs together.

5.3: jute net preparation
 I used a canvas frame approx 50cm x 40cm to support the net while I made it with jute string and lark head knots. Traditional dilly bags are made quite differently but I felt the visual connection would be evident.
Once made however I found the totem shapes were more interesting when interlaced in the net of the bag rather than contained as a bundle inside.

5.4
I photographed the totem in 5.4 all ways and cropped to achieve some more interesting close-ups that I could play with.
5.5
5.6
5.7
To develop these photo shots further into another design or totem, I merged them with sections of the original collages and drawings (5.8 and 5.9) of the gumnuts that I had made in my sketchbook.

5.8

5.9
Without access to a great program like Photoshop I cut out these cropped photos and played around with them to make another totem in 5.10

5.10
Certain areas of this totem I think are worth cropping further and pursuing eg the end on the left with the split gumnut but maybe another time.  For this exercise I simply looked at border edge designs with repeated units as in 5.11 and 5.12

5.11
5.12
Going back to the original photo (5.2) of the 3D totem, I cut out the totem and treated it as a 2D shaped edging and used these as stencils.
5.13
The cut totem was then placed as a design motif on a background of recycled black paper stamped with these stencil outlines (5.14 and 5.15).
5.14
5.15


Design from ethnic source - Chapter 4 cont.

Following on from this post where I was drawing inspiration from indigenous Australian sources I've been developing some more paper designs.
Using the 'kangaroo / boomerang' motif and variations of it, I prepared, on recycled black paper, some monoprinted backgrounds which were a little more interesting and could be progressed into stitched works.
Sian had advised me to think of the 'characteristics' of the inspirational designs that attracted me and use those in developing my own designs.  So I've employed simple colour scheme, tonal contrasts, outlining, repetition but with torn, uneven sizing.

4.15
4.16
4.17
Added motifs developed them into the following:
4.18
4.19
4.20
4.21
On a recent trip to London particularly to the British Musuem I found some interesting painted barkcloth and fibrous weaving from the Pacific islands and Torres Strait islands north of Australia.  A couple of these were inspiration for the recycled paper samples.
4.22: Painted barkcloth (left) stitched sample (right)
4.23: painted barkcloth (left) and stitched sample (right) using momi'd paper, dyed cleaning rags, dyed cloth and tea bags


Thursday, February 12, 2015

Design from ethnic source

For this design work I looked to Australia indigenous art that I had been researching for chapter 1, some examples shown below in 4.1

4.1 from artists (from l to r) Uta Uta Tjangala, Timmy Payungka Tjapangati, and Tjukurrtjanu
From these I drew various simple motifs in coloured pencil / pen / ink.

4.2: sketches from indigenous artwork
Some totems in the National Gallery of Australia, in Canberra really appealed to me and I started to sketch them while I was visiting, when one of the guides came over and allowed me to photograph them.  I had presumed this wasn't permitted, particularly for indigenous artifacts, but it seems the mobile phone has made such policing virtually impossible.

4.3: sculpture by Jeremiah Bonson of the Jinang/Marung peoples from Elcho Is, NT (nga, Canberra) (left) and my sketches (right)
4.4:  by Vincent Namatjira / Nigura (left) and collage torn papers and pen on collaged momigami'd papers (right)
4.5: Tiwi bark basket (left) and thread-wrapped bark fragments on momigami'd paper bag background
I liked the motif in the middle painting in 4.1 and cut out simplified versions of this, from my rusted papers in the last chapter, to design with.  The background black tissue paper (adhered to pelmet vilene) was sprayed with bleach carefully using a toothbrush.  Then an impression of the dotted background was produced using whipstitch with black on top and white in the bobbin.

4.6: shapes cut from rusted papers on bleached paper, additional whipstitch seeding
 A lot of indigenous art and fibrework is obviously coloured using natural eath pigments such as red ochre - a very similar colour to the inside of envelopes used by the National Bank of Australia!

4.7: negative shapes from rust paper on momigami'd bank envelopes
A piece of artwork I have in my own home is an indigenous painting called "Hunting Dreaming" by Dilli which tells the spiritual story of a hunt, featuring the hunters, kangaroos and boomerangs in abstract form.

4.8: "Hunting Dreaming" by Dilli (left) and handwritten annotations on back of painting (right)
I love the kangaroo tracks but in sketching the shapes I tried to develop a new motif to potentially use in my work.  I'm very aware that some motifs found in indigenous art have a spiritual significance that I would not wish to misappropriate in my designs, so I am trying to develop these shapes into something new.

4.9: sketches and design inspired by 4.8
Interesting arrangements were created with shape repeats

4.10: eco printed paper shapes on rust cotton rag
4.11
The 'bird like' negative shapes (in 4.11 and 4.12) might be worth taking further, although 4.12 is just a little too reminiscent of batman.

4.12
4.13 Interlocking of shapes
4.14

Saturday, January 26, 2013

Design work - ch 9

This design chapter begins by examining gradual colour combinations of two colours.

9.1
 I chose the magenta but couldn't decide on the other colour.  I tried a rich green (bottom row in 9.1) but the combinations proved too dark.  A yellow (middle row) gave bright combinations but I went with the lime green (top row) as I liked the browner combinations.

So here are initial swatches of these colour combinations:
9.2
9.3
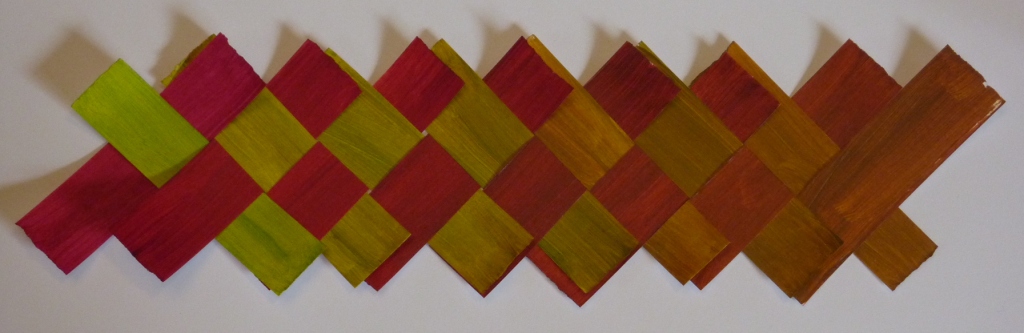
9.4 weaving of strips
I made A4 sheets of these colours as backgrounds using sponging and general washes and played around with 'patches' of these swatches on these backgrounds.
9.5 reverses the colour transition of the background .
9.5
 9.6 plays with the two end colours on lime green - stark shapes.
9.6
9.7
9.10
 9.11 and 9.12 show the difference between a cooler (predominantly green background) and a warmer background for the same motifs
9.11
9.12
The motifs become a little lost on a busy background of the same colours (9.13)
9.13
One of these colours, magenta selected here, was used to prepare tonal sheets using white and dark grey.  Strips and blocks were cut from these sheets and replaced.

9.14
9.15
And with the addition of an original swatch motif (9.16)- interesting but the hue of the background has changed too much in the photocopying stage I feel to connect with the motif.

9.16
Section B then takes these colour combinations and develops shape into the designing process.  Initially I played with my slip shapes from previous chapters and the tonal sheets of magenta. I got a bit carried away with a photocopier, rearranging shapes and taking photos so I've edited the work with the following selected shots.  9.17 and 9.18 show subtle lines of slip shape with the tonal changes.

9.17
9.18

Then clearer contrasts in tone in the following photos:

9.19
9.20
 A change in slip shape:
9.21
A variation in size of the slips:

9.22
9.23
A background was prepared using the slips as masking stencils to create white shapes, then offset to different extents with various slips as in 9.24 and 9.25
9.24

9.25
I particularly like the graphic 3D block look of the last design.  The rest of the chapter concentrates on 3D designing but will follow in another post.