Pages

Thursday, May 9, 2013

PAP3 samples

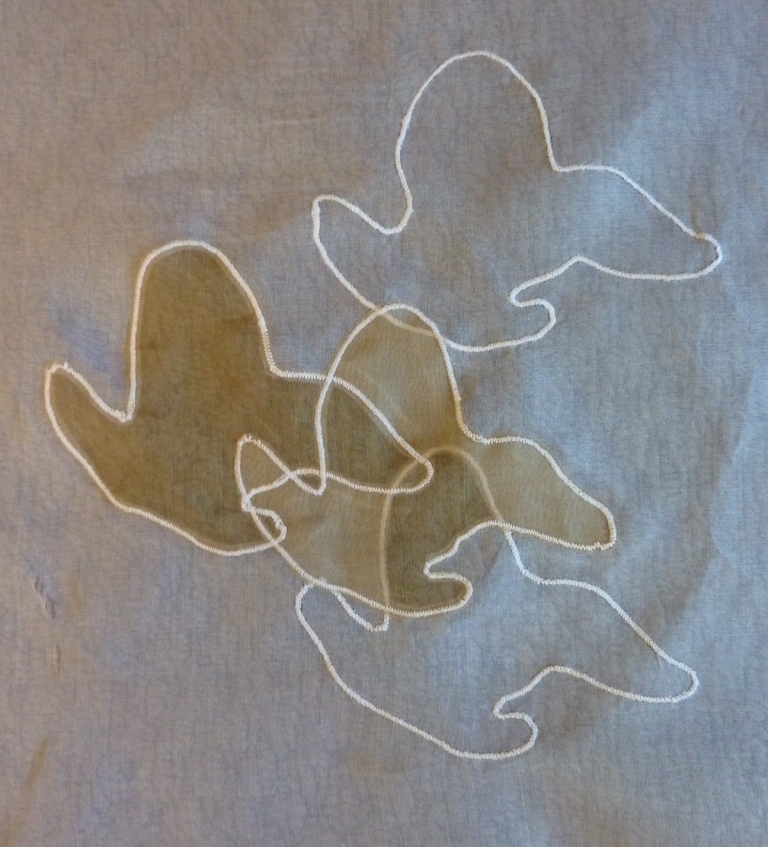
I've been trying out a few ideas of cutwork and lace for the background and edging of my PAP3 hanging.  These are sewn on silk organza and hand cut:

12.1
 It's not too clear from 12.1 but sections of the shapes have been cut away to give a shadow effect and colour shading
12.2
In 12.2 the top shape fabric was completely removed once the outline sewn then restabilised in a hoop and lace stitched on watersoluble fabric.  In the bottom shape only sections of the fabric were removed - a sort of broderie anglaise look.

12.3
In 12.3 I was looking at creating a staggered shape hanging in the gap, which I like and fits with my 'falling' shapes in the design.

I've also worked on some hand-dyed prefelt for the hanging, using an electric urn.

12.4
 I dyed some white prefelt a lichen / lime green using an ombre technique to get colour gradation. The wool is gradually pulled out of the pot over a wood block, then covered and steamed to set. You can see a sample of that in 12.5 below on the far right of the photo.  Then most of this prefelt was overdyed again using a dark blue acid dye again by the ombre technique (2nd from right in photo below) and directly in the pot having been shibori tied to retain areas of green (left of photo below)

12.5 dyed prefelt
12.6
A selection of tonal felts were similarly created from white using black acid dye (photo 12.6) to use in the black/white monotonal part of the design.  The colour variation within each piece was not as great as I had imagined (too much liquid in the pot so the dye dispersed and dyed fairly evenly) so I'll perhaps add wisps of wool roving to break up the colour or hand stitch after.


Thursday, May 2, 2013

What can I felt now?

Last September I went into a felting frenzy following a week's forum with Anita Larkin, where I kept trying to felt objects, completely encasing things that you wouldn't expect, with varied success of course, sometimes with the associated question from someone "how did you get it in there?" but more often "so why did you do that, again?"
Undaunted I've carried on, midst comments from my better half like "wet dog smell again - your mother's still obsessed" and "is it safe to sit down yet with out being covered in wool?" and the favourite "are you going to felt something useful soon?"

Sooo, with our anniversary coming up I decided to teach him a lesson.

With his great love of music, any music it seems, he has several pairs of headphones.  But one set is treated with such care and attention, never to be laid of its side without adequate cushioning for fear of "imbalancing the connectors"etc. In fact the best storage place is seemingly on a person's head according to him.

No, I know what you're thinking but I didn't felt those - that would have been too cruel (not to mention costly).

I decided to felt a head for him!

So here it is in its dry felted infancy - a blob about 50cm by 30cm (a 30cm ruler is in the photo for scale) covering a polystyrene head which is about 30cm by 20cm inside.  I need it 1.5 to 2x bigger to account for the shrinkage on felting.

A little decoration of dark green roving strands were addded and wet felting of the outer skin started.

Once the felt has strength, the bubble wrap/  bulking material inside is removed (through a tore hole) and the fun of fulling the felt, shrinking it to shape gradually begins.  With care the torn hole can be resealed as the felt fulls trapping the head inside.
A very loose shroud -

 then more of a mask - 
Slowly shrinking in the neck area and the features begin to develop - 

 until finally a head appears - 


and does it serve its purpose?


I think so!
The truth will come out on Monday 6th.....


Saturday, April 27, 2013

Felt and lace do go together

Been working in the background on some samples for my PAP3 trying out some lace effects with my motif and thinking how to blend them with felt motifs.  Not so much success there as they still look blocky and clunky to me but will blog on them next week once I have something to show.
In the foreground I have been finishing a wearable jacket which employs felting and the lacework together:


The bodice uses tissue felting silk which I scrunch dyed (for want of a better description) in lilac and blue then nunofelted onto lilac merino roving with prefelt motifs in blue incorporated on top.  I drafted a fairly fitted pattern and then cut the pieces from the nunofelt and made up the jacket as in conventional dressmaking.  The jacket is fully lined and has a open end zip to make it a little contemporary.

The sleeves, apart from taking about 5 hours each to make (aargh),  are made from synthetic chiffon embroidered with a repeat pattern of my motif (yes, that motif again!) and the lacework achieved with a soldering iron.


I also made individual lace motifs from the chiffon to applique on to the felt from shoulder across the front of the jacket to tie the sleeves and bodice together so to speak.

I'm hoping that this piece will be part of a collection of wearable pieces for exhibition- a very small collection I suspect at this rate!

Now back to those samples....

Sunday, April 7, 2013

Composition thoughts on PAP3

On Sian's suggestion, I have been rethinking my composition for the PAP design, trying to create a little more interest and not be constrained by my thoughts on "how difficult will that be to felt?".
I've largely been cropping the image and repeating and settled on this:

I liked the asymmetrical positioning and the fact that the staggered repeats are different sizes.  The coloured shapes will fall off the bottom of the work but the outside edges will not be straight.  The bottom and right hand edge of the organza will echo the shapes in lace and cutwork, full of negative spaces to break it up.  I have drawn a few outlines in pencil of the shapes where some of the negative shapes will be to suggest the that the felt shapes have slipped / fallen off the background.
The 2 thin profiles I think will be in greyscale and the coloured one in dark blues to light green.

After looking at this a while I thought about cutting through the profiles to give 3 strips joined by lacework or not at all.  The lines seem to echo the dropping shapes.


Tuesday, March 26, 2013

More on PAP3

Have been working a little more on my assessment piece design (left), trying to decide how to employ felting techniques into the piece but still give a light, lacy appearance to the hanging.

My idea behind this design was the 'break up' or disintegration of the facial profile into its component (motif) parts.  Since the original profile is my son's it is my representation of him moving on from childhood to adulthood, the passage of time.  That image is fleeting and all too quickly gone.

I now have a specific installation site in mind for this too, having been given an opportunity at the end of this year to exhibit in a Sydney gallery.  I'd love it to hang there with a window as backdrop hence the need to work with the stream of natural light.

I've understandably scaled up the main part of the design and despite repeated photocopying producing dodgy tones, hopefully you get the idea.  This will make it about 1m by 1.75m

The colour swatches are from the intended exhibition colour theme so I anticipate using a dark blue as the darkest tone towards the light green as the lightest tone.

The profile pieces and the repeating shapes would be cut from prepared pre-felts and felted onto one translucent backing fabric.  I began sampling how the tonally different shapes would appear felted in an overlapping manner given there is always some colour transference taking place in the felting process, and looked at potential backing fabrics.  The size of the shape is the actual size in the scaled up design.

prefelts on scrim (with flash)
Here the prefelts are felted on a cream cotton scrim and retain their shape well. I tried machine embroidering on the dark prefelt (top of photo) with wool thread before felting and that worked well.
prefelts on scrim (without flash)
 Taken without the flash gives you a better view of the translucency.

I then tried using silk organza as the backing
prefelts on silk organza (with flash)
I had plans to write using machine embroidery on the fabric background with script eg. childhood, moment in time, fleeting etc but this only seemed possible on the organza - too much damage, thread pulling happened on the scrim.

So the upshot - the organza gives clean prefelts on the front but less visible on the back with gathering due to felting shrinkage.  But it does allow me to free motion write in the background.
The scrim I kind of prefer as it's more rustic, the openness of the weave is forgiving of the shrinkage and so i think will hang better, but I can't write in the background.  Is that something that I should do anyway?
If I went with the organza I'd dye that a cream / shell colour first, probably with hand dyed tonal variations produced.
Whichever fabric backing I use I plan to hand dye or paint the wool tops / prefelt to get a bit more colour variation (less blocky look) and probably embroider them a little before felting.  More after ?

I also plan to make some nuno prefelt shapes with digital images to felt in, and perhaps lace versions to add that would taper off at the base of the hanging.

Lots to think about....