Using my decorated papers as inspiration I prepared two tonally different stitched surfaces from which to cut out slips.
Both surfaces were approximately A4 in size and used a thin synthetic bag batting as the base. The first (photo 5.1) used various dyed cottons and syntheic sheers, with free machining on top then a little distressing with a heat gun to burn back some of the layers.
 |
| 5.1 |
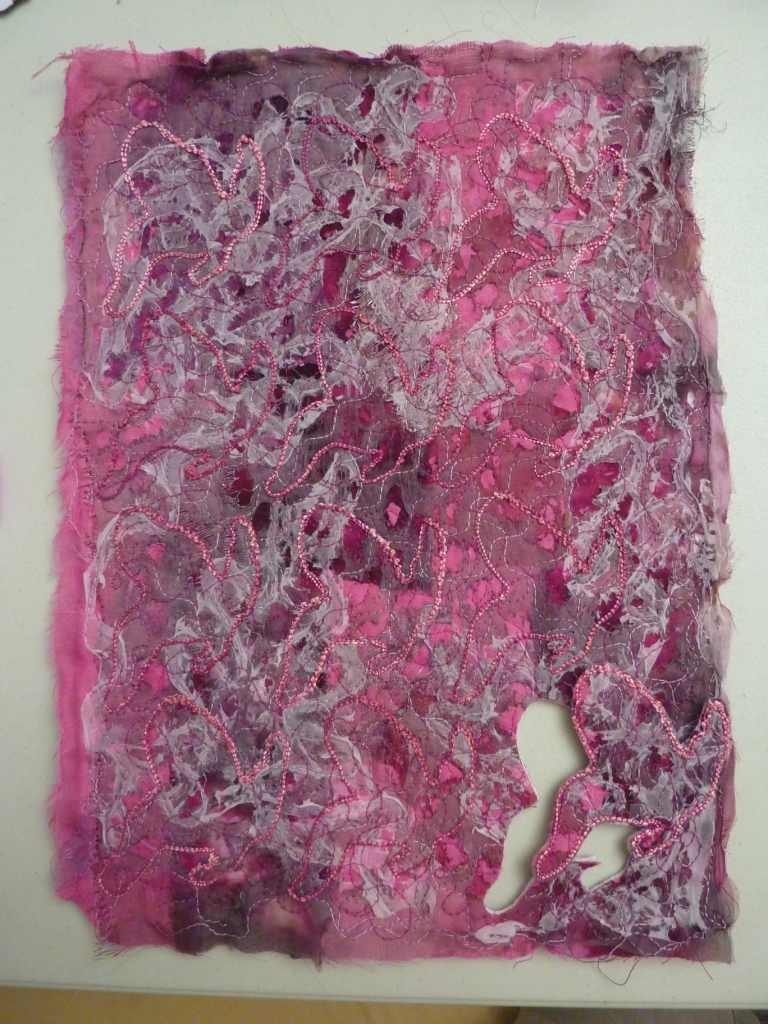
The second (5.2) was prepared in similar materials but paler in colour and with some machine decorative stitching (floral design) in diagonal lines before zapping.
 |
| 5.2 |
My magnolia slip shape was used to draw out the slips on the back (5.3) and then stitched around twice using a perle 8 in the bobbin before cutting out.(5.4)
 |
| 5.3 slips drawn out on back of stitched surface |
 |
| 5.4 showing cable outlines and one slip cut out |
I then had fun applying these slips to various backgrounds as follows:
 |
| 5.5 |
In 5.5 above, the slips are simply wrapped in yellow and purple perle threads, and the ends of these wrappings couched on to the background - one of my decorated papers from chapter 3.
The background was obviously paper based so it was crumpled repeatedly to achieve a fabric like feel, then waxed or oiled a little, left to dry off a bit overnight and ironed on to a thickish vilene interfacing to make stitching easier. This was the same method used with the following backgrounds (5.6 - 5.13)
 |
| 5.6 |
In 5.6, another decorated paper background is used. Several layers of black polyester organza covered over the motifs, echo lines of stitching sewn trapping the slips, then a soldering iron used to cut back some of the layers and create a shadow effect. It's not clear from the photo but the central layer of organza is left hanging like a flap, or a petal.
 |
| 5.7 |
The background in 5.7 comes from Module 2, which I have over-stitched in pink with flowing swirls to echo the stamps and buttonhole stitch along some of the stripped piecing. The slips are attached with simliar buttonhole stitch.
 |
| 5.8 |
5.8 uses a stencilled background from Module 3 strapwork design. The slips are attached as the looped seed bead edging is made. More detail is shown in 5.9. The edging makes the slip look quite Elizabethan and suits the background although the colourings are quite different.
 |
| 5.9: close up detail of sample in 5.8 |
I reprinted the strapwork background and gave it a pink/magenta wash and background machine stitching before applying the paler slips (5.10). These were attached with further lines of decorative stitching in dark purple thread to blend colours.
 |
| 5.10 |
 |
| 5.11 |
Since my overall theme for the diploma work is one of vegetation I returned to Module 1 research and used a decorated paper with a leaf pattern as background in 5.11. Similar free machining in leaf pattern attached the edges of the slips.
 |
| 5.12 |
Design work in Module 1 had produced this background in 5.12 from a digital of leaves in suitable colours. I added the slips, trapped under strips of dyed scrim and outlined in couched perle 5. I like the way the couching works with the yellow crayon marks on the original scan.
 |
| 5.13 |
5.13 has the same b&w leaf photo (without being scribbled on) given an olive wash and surface free stitching. Both slips are attached with displaced silhouettes in cabling - gives movement in the direction of the hanging leaves....maybe?


3 comments:
Beautiful work! You have certainly succeeded in re-inventing the applied slip.
What a great variety you've got here, some wonderful colours and patterns. I especially like 5.8 and 5.9, such an a unexpected combination.
A lovely collection, I particularly like the freeflowing ines in 5.5 and the way the slips work with the background in 5.12.
Post a Comment