Pages

Saturday, December 25, 2010

Christmas cheer

Course work has been a bit 'thin on the ground' recently as we took a break up to the Gold coast last week before Christmas but I thought I'd share some photos with those of you lacking from heat in the UK at the moment.

And this is high season!
We also did the theme parks and water parks for my son - son and hubbie exhausted themselves up and down horrendous water slides while I got some serious reading done for once, except for the odd rollercoaster - it has to be done!
Hubbie is the one screaming like a girl second from back!
 I took some knitting supplies for later felting but it just wasn't the weather for it and the reading won. I can thoroughly recommend Kate Atkinson's "Got up Early, took my dog" if you haven't discovered it already - definitely up to her usual standard.
Before we left I finished a couple of nunfelted bags for Christmas presents for family back in UK but I fear they may still be languishing in the snowbound post offices of Scotland.

So here's a photo, mum, it's on its way, honestly.

I do hope you all have a lovely restful Christmas with plenty of time for textile art, of course. Many thanks for your supportive comments this year, guys. 

Thursday, November 18, 2010

Sculpture by the sea for 2010

"Sculpture by the Sea" has just finished for another year in Sydney but we did manage to get down to Bondi on Thursday evening after it had been raining over the last weekend.  You have to walk along the headland from Tamarama Beach to Bondi to see all the sculptures which is great, but not so much in driving rain!
The light was fading a bit so the photos are not as good as they could have been but here are some of my favourites.


The shark fin is made out of car doors


Detail showing the eggs inside
"chicken chainmail"


The glass pieces reminded me of Jane's hanging

This would have been lovely to see in different lights.
detail of above

This was the only fibre-based exhibit this year


Tuesday, November 16, 2010

Printmaking

A few weeks ago I had the opportunity to try my hand at print making with a real print roller.  My daughter has been having a course of printmaking lessons at weekends to help her HSC studies from Andy Totman of the National Art School, at the Newington Armoury studios, Sydney Olympic Park.  She couldn't attend one of the days so I went in her place.

We were introduced to photo polymer (solar) plates which I'd never used before.  The plates have a surface which is activated by sunlight and so by placing an black and white acetate image on top and leaving in the sun, an etching is produced from which prints can be made.  It's a bit like cyanotyping where the treated fabric exposed to the sun turns blue but not where the fabric is covered.


I chose a photographic image of a neighbour's tree I frequently use in my sketchbook.  Once exposed for 2-3 minutes the plate is immersed in water and gently the excess polymer coating is rubbed away to reveal the image.
The plate was inked up with oil based printing ink and a print produced under the roller press.


I was amazed by the detail produced particularly when so little ink is used. I printed a couple more - one over a newsprint and one with a second inking in red on top.


By overlapping the acetate images on the plate then exposing to the sun, you can get multiple images on the one print.  I mixed some Shakespeare with Stonehenge.

We also did some monoprinting, using some torn muslin and threads as resist.


I personally prefer the second print from the plate which is a little more subtle and shows more textural detail.


Friday, October 29, 2010

It's getting warm - Christmas is coming!

Today was the opening of the Wheel 'n' Weft craft group Christmas sale in Thornleigh, of which I'm a member, and it was extremely busy.  The first few hours are usually hectic but today seemed extra busy - must have been the homebaking and the Christmas music! 
I took some photos to give you a flavour of the place and the other members' work - glass, textiles, wood etc etc

Rhondda Retallack

Jenny Gordon


Elaine Farrington

Lindie d'Ath-Weston

The sale and exhibition is on until Sunday 31 October 4pm so do stop by.

Thursday, October 14, 2010

Nunofelted shibori silk

Last month I blogged about a shibori workshop that I'd attended and had quite a few pieces of fabric at the end of it.  One of those was a black piece of silk georgette that I had put marble resists into then discharged the dye.  The resulting discharged silk was lovely in itself but I felt that I probably would never do anything with it as silk.
I decided to nuno felt that piece with black wool batts so that I could make it into a bag .....of course.
I managed to get very little distortion of the silk during the process to allow the pattern still to be evident:


I ended up having enough felt to make two bags:


The one on the left is a casual sling / messenger type bag with an adjustable webbing strap.

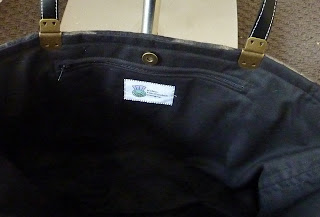
The other is larger and a bit smarter with purchased handles and a solid base with little purse feet.  The larger one also has a zipped pocket inside and both have magnetic closures.

For those of you in the area, you'll find me next in the Wheel 'n'Weft Christmas sale, Thornleigh community Centre, Thornleigh (29-31 Oct).


Sunday, October 10, 2010

Some monoprinting fun

I brought out my piece from summer school this week (while I was looking for something else of course) and thought that I would make something of or at least with it.  Two minutes later I decided it would stay as it was "for later consideration", just couldn't cut it up etc.  However I was inspired enough to get the fabric paints out again and print some more.

I found some A4 ish pieces of fabric that I'd dyed a terrible puce yellow for some reason and thought they'd be ideal for a makeover.
I got quite into it and was fairly pleased with the prints so I turned them into smallish bags that I thought would sell at my next sale.


I did some free embroidery on each design to echo the print designs, backed on to interfacing then wadding.
The bags are closed with flexiframes - you used to only get these in 3.5inch widths but I've now discovered 4.5inch ones that you can at least get your hand through, wonderful - the things that excite me!!

The cording means they can be hung, or put a lobster clasp through the loops at the side and you can attach it to your belt, handbag. 


Monday, September 27, 2010

Alchemy!

I think this was a very useful exercise if only to find out which metallic threads my machine liked and which ones it absolutely hated (those I've relegated to the next free for all at ATASDA social day bearing a "health warning"!).
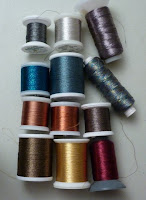
The metallics I used are in the photo below (in the same arrangement as used in the samples):

The middle pale blue in the second row...aargh...Madeira no.15 if any of you fare better with it free machining without producing birds' nests underfoot let me know.

9.1
 
9.2

9.1 and 9.2 the samples of machining those metallics with red and blue thread, respectively, in the bobbin.
Some of the differences in overall colour are more obvious than others.

The next exercise was to pick one metallic and stitch samples using different colours of bobbin thread.  I picked the very gold metallic (middle of bottom row) and used 4 colours from my research eg. shades of coral and green.

9.3
 9.3 shows the back of the work and the bobbin colours.

9.4
9.4 shows the front.  Each metallic/bobbin thread is sewn in 4 directions to test for any colour changes with light reflection.

Wednesday, September 22, 2010

Disappearing Shibori

I spent today at a wonderful workshop run by ATASDA NSW in  Sydney with Barbara Schey, renowned shibori textile artist.  Barbara is part of a great exhibition "Scarf"on at the moment by the World shibori Network Australia in the Barometer Gallery, Paddington, in Sydney.  For those of you in the area I thoroughly recommend visiting before it closes on 3 October.
Barbara was showing us some techniques for creating shibori patterns by discharging dye from black fabric.  She has some amazing blocks and clamps largely homemade as is typical of her thrifty self and she was typically generous in letting us loose on them to experiment.  There was no end to our samples as she'd  kindly brought along further cotton fabric supplies for us to purchase and Sylvia of silksational was also on hand with silk - dangerous temptation!

Barbara has a great laboursaving device for binding fabric on to a pole to create arashi designs.


I wrapped plain black cotton homespun using it and discharged the dye using bleach and vinegar to produce this piece of fabric. 

I love the herringbone pattern myself. Barbara's husband had 'run up' that piece of hardware for her, of course.  I can't see mine doing that somehow - buys me great textile works of art but not constructively good with a hammer!


Shaped wooden blocks were clamped around the folded cotton voile, wrapped in string and then treated with bleach and vinegar to produce these patterns:

It's always interesting to see the different colours that the different black fabrics can be discharged to.
As well as discharging cotton and other plant based fabrics we looked at silk, using TUD and vinegar to discharge the colour.


I played around with black silk georgette, using marbles and elastic bands as resists to produce this piece of fabric - a bit more organic than I expected but definitely has possibilities.


There was so much more we learned about but ran out of experimenting time, like degumming and melting back lame that I left buzzing with ideas - so many plans, so little time.......

Saturday, September 18, 2010

Twisting and turning

After spending most of a day playing with wire, I felt like this little chap!
I think I need to keep a safe distance between me and a reel of wire for a bit now!
A quick summary of the types of coils or purls I did manage to produce that were presentable.

8.1

8.1 shows at the top of the photo, some purchased tubular cord and some of the metallic wire from gauge 20 up to 28.  I made quite a few lengths of purl as in the centre then had fun recoiling these lengths over purl cores.  "Beads" like those at the bottom were produced.

8.2
8.2 I looked at covering the wire before coiling.  At the top is garden wire bought covered in green plastic coating then coiled.  The second one is gold wire covered in red cotton embroidery floss then coiled.
In the middle I pushed the length of wire inside cotton tubular knitting yarn then coiled.  A length of this coil was then recoiled to produce the shorter fawn coloured purl under that.
The gold coil is the purchased gold cord at the top wired and coiled like the knitting yarn above it.
The bottom one is coiled wire which has been beaded with white seed beads before coiling.