Pages

Monday, September 27, 2010

Alchemy!

I think this was a very useful exercise if only to find out which metallic threads my machine liked and which ones it absolutely hated (those I've relegated to the next free for all at ATASDA social day bearing a "health warning"!).
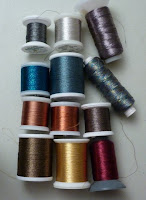
The metallics I used are in the photo below (in the same arrangement as used in the samples):

The middle pale blue in the second row...aargh...Madeira no.15 if any of you fare better with it free machining without producing birds' nests underfoot let me know.

9.1
 
9.2

9.1 and 9.2 the samples of machining those metallics with red and blue thread, respectively, in the bobbin.
Some of the differences in overall colour are more obvious than others.

The next exercise was to pick one metallic and stitch samples using different colours of bobbin thread.  I picked the very gold metallic (middle of bottom row) and used 4 colours from my research eg. shades of coral and green.

9.3
 9.3 shows the back of the work and the bobbin colours.

9.4
9.4 shows the front.  Each metallic/bobbin thread is sewn in 4 directions to test for any colour changes with light reflection.

Wednesday, September 22, 2010

Disappearing Shibori

I spent today at a wonderful workshop run by ATASDA NSW in  Sydney with Barbara Schey, renowned shibori textile artist.  Barbara is part of a great exhibition "Scarf"on at the moment by the World shibori Network Australia in the Barometer Gallery, Paddington, in Sydney.  For those of you in the area I thoroughly recommend visiting before it closes on 3 October.
Barbara was showing us some techniques for creating shibori patterns by discharging dye from black fabric.  She has some amazing blocks and clamps largely homemade as is typical of her thrifty self and she was typically generous in letting us loose on them to experiment.  There was no end to our samples as she'd  kindly brought along further cotton fabric supplies for us to purchase and Sylvia of silksational was also on hand with silk - dangerous temptation!

Barbara has a great laboursaving device for binding fabric on to a pole to create arashi designs.


I wrapped plain black cotton homespun using it and discharged the dye using bleach and vinegar to produce this piece of fabric. 

I love the herringbone pattern myself. Barbara's husband had 'run up' that piece of hardware for her, of course.  I can't see mine doing that somehow - buys me great textile works of art but not constructively good with a hammer!


Shaped wooden blocks were clamped around the folded cotton voile, wrapped in string and then treated with bleach and vinegar to produce these patterns:

It's always interesting to see the different colours that the different black fabrics can be discharged to.
As well as discharging cotton and other plant based fabrics we looked at silk, using TUD and vinegar to discharge the colour.


I played around with black silk georgette, using marbles and elastic bands as resists to produce this piece of fabric - a bit more organic than I expected but definitely has possibilities.


There was so much more we learned about but ran out of experimenting time, like degumming and melting back lame that I left buzzing with ideas - so many plans, so little time.......

Saturday, September 18, 2010

Twisting and turning

After spending most of a day playing with wire, I felt like this little chap!
I think I need to keep a safe distance between me and a reel of wire for a bit now!
A quick summary of the types of coils or purls I did manage to produce that were presentable.

8.1

8.1 shows at the top of the photo, some purchased tubular cord and some of the metallic wire from gauge 20 up to 28.  I made quite a few lengths of purl as in the centre then had fun recoiling these lengths over purl cores.  "Beads" like those at the bottom were produced.

8.2
8.2 I looked at covering the wire before coiling.  At the top is garden wire bought covered in green plastic coating then coiled.  The second one is gold wire covered in red cotton embroidery floss then coiled.
In the middle I pushed the length of wire inside cotton tubular knitting yarn then coiled.  A length of this coil was then recoiled to produce the shorter fawn coloured purl under that.
The gold coil is the purchased gold cord at the top wired and coiled like the knitting yarn above it.
The bottom one is coiled wire which has been beaded with white seed beads before coiling.

Thursday, September 16, 2010

Shisha vs machine

Yes, I plucked up the courage, found the safety glasses from my lab days, and had a nervous go at sewing around those mirrors.  I think it's a bit like standing on the edge of a cliff - no matter how much you try not to you keep seeing yourself jumping off.  I concentrate like mad and still see the needle veering towards the glass.
If truth be told (and you look closely) I actually only machined around mirrors in 2 of the samples - and that was after I had practised with 2 samples using metal foil, just incase.....  Still, I persevered....

Incidentally, all these samples and the others 7.1-7.5 in the previous post are about 20cm x 20cm in size.

7.6
7.6 My first practice go - Red bobbin thread and yellow top tighter tension in star formation over shisha of gold foil.
 
7.7
  
7.7 (detail)

7.7 The back ground in this one has spiral pattern of a rubbing with gold oil pastel. Free machine swirls made over a metallic organza entrapping glass pebbles then areas of the sheer cut away to reveal the pattern underneath.  I made a hole over one of the pebbles to make it more shisha-like but decided that I preferred the covered look on the others.
7.8

7.8 Background rubbing in gold pastel over one of my blocks from before.  Then shisha mirrors trapped under machine couched tramlines of red perle cotton.  Further free machining done on top in metallic thread echoing the rubbing marks - not as clear as I had hoped unfortunately.


7.9

7.9 detail
 7.9 Green and gold pastel rubbing on olive green dyed cotton background. Echoing swirls in metallic free machining.  Fragments of broken mirror that I already had from a mosaic class hand sewn with gold seed beads and gold thread.  Shisha mirrors machine sewn in star formation in centre and then the rubbing marks emphasised in hand blanket stitch using gold embroidery thread.
I do like the way that the beads (in the detail photo) are reflected in the mirror.


7.10
7.10 In this sample the gold foil shisha are held down with overlapping jump rings cut from a metal purl I made around a pencil.  they are hand stitched on then free machining in whip stitch with red bobbin thread on top echoes the ring patterns and the rubbing markings on the fabric.  The fabric is the same green as in 7.9 but the photo makes it appear brownish here.

Monday, September 13, 2010

Contemporary Shisha by hand

I had fun finding contemporary things that could be embroidered onto fabric like shisha mirrors - not always shiny or reflective but at least they were roundish, well at least they were at the start.
7.1
7.1 The top row shows individual aluminium blisters (from a strip pack of medicinal tablets) held by buttonhole stitch in gold perle.
The middle row shows the bottom rounds of egg boxes as shisha, held by crossed stitches of gold purl with interlacing in the centre.
The bottom row uses the little stickers found on kiwi fruit in place of mirrors under gold lurex twisted and stitched across mimicking the stamped pattern on the background.

7.2
7.2 uses the same stamp on the background.  On the far right the diagonal row has cast bark circles as shisha.  This was my attempt at linking things back to my research theme of vegetation and trees.  There is a huge eucalypt in our garden that has little lumps and indentations all over the trunk. When the bark is cast off every year these little circular bark pieces drop off like counters.  Here they are attached by interlacing jute string.
The other 2 diagonal rows have shisha 'parcels' of copper shim and copper mesh held down by short sections of gold wire purls couched down at each end.

7.3
7.3 The background pattern here was created by rolling of the roller after it had inked the stamp.  The circuit pieces came from an old digital camera and I have held them down with 24 gauge brass wire.  Not exactly round or sparkly but definitely contemporary!

7.4
7.4  I thought about the Indian relevance in these contemporary samples and used small images of Indian henna painted hands in place of shisha in the relief rubbing patterns.  Each hand is held down by a crosshatch of gold lurex thread to create square outlines copying the checkerboard pattern in the henna design.  The squares theme is repeated in the stamping on the background, the square pieces of brass mesh and the square embroidery around the shisha mirrors in the centre of each motif.  One mirror has the square edged in buttonhole stitch, and the other has the buttonhole stitch in the opposite configuration.

7.5
7.5  OK, these 'shisha' can't exactly be called round but they are shiny - pieces of CD, the country songs of which I am now saved from - I think they've gone to a better place!
The left motif using the shape of my stamp again, have the pieces outlined by chain stitch then held in place by the pink floss interlaced through those stitches.
On the right, loosely based on another motif from the original embroidery, the pieces were held by green herringbone stitches interlaced.  The spaces between these pieces have been laced further with pink floss.  I like the fractured look to the piece and where the foil has peeled away from the CD perspex.

Saturday, September 11, 2010

Sketchbook finally felted!


I've finally dressed my nude A3 sketchbook from Module 1 with the piece of nunofelt that I made in Orange in April.

I made a sleeved jacket for the ring binder using interfaced homespun cotton on the inside that had been hand dyed.  The raw edges were folded over on all 4 sides of the sleeve panel then stitched in place on 3 sides to give the pocket for the folder cover.


All my A3 sheets seemed better protected in plastic sleeves this way plus I could have an envelope sleeve at the back to hold all the little samples I did while working on my dress.
It also means I can add to the folder if I need to.

Friday, September 10, 2010

Decorative details from indian textiles- chapter 6

I used the relief blocks made previously to create decorated papers 6.1 to 6.8 based on Indian enbroidery themes.


These rubbing images above use Markal sticks on black and gold tissue paper and on black crepe paper.  In some I repeated the same image, others used several block rubbings together.

In 6.9 (above left), the paper was pleated then repeat rubbings made before opening out the paper again.  In 6.10 (above right) a strip collage was made using pieces from 6.3 and 6.4.

6.11

6.12
6.11 and 6.12 and 6.13 have stamped prints in gold acrylic (6.12 pleated before stamping) over the layer of rubbings.

6.13
I suspect that smaller areas of these papers will be more interesting for further study later in the module, rather than the whole piece eg as in the section below.

6.14

Tuesday, September 7, 2010

Shi-sha embroidery

I had some difficulty in finding an example of Indian embroidery to study "in the flesh" that was authentic, so I resorted to the internet and found some good closeups of embroidered fabric.  That along with a few reference books ("Embroidered Textiles" by Sheila Payne and "Indian Embroidery" by Rosemary Crill) from the library gave me a good idea of the stitches involved.

5.1
My study embroidery is in the centre of this photo (5.1) and my drawings in black pen and white ink are scattered around.  The colour was added generally by pigment pencils and washed over with water.

5.2
In 5.2 I drew with a kebab stick dipped in bleach on black handmade paper (left).  I had this paper left over from the Certificate studies when I had dyed the pulp with black procion dye.  The image I was recreating (centre) was drawn in Markal oil sticks as a resist over a texture plate (right) then washed with brusho solution. 

5.3
In 5.3 I used the Markal sticks over the same plate on black tissue paper.  I felt the rubbing gave patterns very similar to the original white chain stitch on black.

5.4
5.4 shows a few relief patterns that I made using translucent liquid polymer clay (TLPC) on cardboard. This polymer clay is intended to allow patterns / pictures to adhere permanently onto polymer clay for jewellery pieces or other motifs, but I've never used it for that purpose.  I produce weblike structures that can stand on their own for 3D work or attach onto hangings etc.  If spread thinly enough the sheet is flexible, can be cut easily, stitched through and even better the tranlucent base can be coloured with pigments before curing or painted afterwards.  Oh, I could go on for ages - love the stuff.  I taught a workshop last month and the TLPC kind of took over for some ladies!
Anyway, here on cardboard it's fixed itself, won't peel off and so produces a useful stamp / relief block. 
The rubbings in 5.4 show that a constant line is not produced but I like that incomplete look to the patterns.

5.5
5.5 shows three relief blocks made with blind cord on lino tiles.  The tiles are great because the stamp has a bit of flexibility (a bit like monoprinting with Ruth on flexible acetate - what a revelation that was for me!).
The rubbings are made using pastels or wax crayons on tissue paper or thin paper bags.

5.6
5.6 - The block (the green one in the bottom right of photograph) was made from an easy carve block.  The other pattern is cut on the other side of the block.  The prints are made using (clockwise from bottom right) rubbings on black tissue paper with white and gold Markal and white wax crayon, monoprints with green acrylic on paper, and rubbings on inked paper with Markal.

5.7
5.7 I had a go at replicating some of the designs in my study shi-sha mirrored embroidery.  The background fabric was dyed homespun and a little chlorine was used to trace the outline shapes for embroidery.
The sample piece includes normal chain stitch, open chain stitch, back stitch, buttonhole stitch, normal herringbone and Indian (double) herringbone stitch, roman stitch over laidwork and couching in addition to shisha stitch around the mirrors.  Not so sure I like the colour scheme but it's true to the original.

Wednesday, September 1, 2010

Voyages of the imagination

ATASDA's exhibtion of textile art finished on Tuesday at the Palm House, Botanic Gardens, Sydney and I went back in to collect my piece and help to clear up for another two years.


It had been held in the Palm House, an historic glass house of the Botanic Gardens, with obviously plenty of natural light inside.


Situated in the gardens and also very close to the Art Gallery of NSW, we were visited by many tourists and locals alike which made for interesting conversations about our work and organisation. 

Sorry, Maz, I caught you in mid-walk across the doorway.  I'd love to put up some photos of the exhibits but don't have permission at present so you'll have to make do with these shots and imagine.....