Pages

Showing posts with label lacework. Show all posts

Friday, January 1, 2016

A little extra on Sterculia

While I was working on my Sterculia hanging I began to develop an accompanying wearable piece and was fortunate enough to have both works on exhibition in November through the Untethered textile group in Hornsby, NSW.

Sterculia II
Since the Sterculia plant was pharmaceutically related to the human body I felt a wearable piece was in order.  The constriction and discomfort often felt by IBS sufferers can be symptomatically relieved by this product.  This is depicted here through the use of tendrils winding around the human form, from the rigid thorn-like fronds around the neck to gradual relaxation until the tendrils open out into a lacy array of colour at the base.

Some more detailed photos:

Bodice top featuring wired tendrils
The barl-like bodice was made using hand dyed merino with tissue silk nunofelted underneath with numerous resists incorporating yarn and pencil roving.  A concealed zip is sewn in the side seam for wearablility.

Back of bodice
Sections of the bodice do not have silk structure on reverse which enables the felt lattice to fold over loosely at the top edge like peeling bark.

lower lace dress
The lattice tendrils were prepared separately and stitched on to the long bodice using seed beeds and motifs only as far as the hip area.  The rest of the tendrils (in one length 6m in total) are wound by hand once on the model using internally wired tendrils to create the neck feature.

detail of wrapping tendrils
The organza motifs found in the hanging are repeated on this garment.


Sunday, June 23, 2013

PAP3 developments

Moving on from my samples of motifs on organza and rethought design in previous postings I sketched a working paper design in the colours I wanted to use.

12.7 design
The paper design has additional shapes to the felt motifs which will be in dyed organza then outlined motifs in colour and in white - a sort of progression into translucency, bearing in mind that I wish to hang this freely in a window space.  The very white sections on the drawing represent cut areas in the organza.

So here is the laying out of the design in prefelted shapes.  Because of the size (about 3m x 1.5m) I did this on the floor then struggled with getting it to the felting table in one piece.  Note to self: get a bigger table.

12.8 laying out felting design
The felting in process a section at a time:

12.9 nunofelting process
and the nunofelted organza before stitching anything:
12.10 Nunofelted hanging on organza
I have now worked into this organza adding the dyed organza motifs, embroidered shapes and cutwork.

12.11
You'll have to excuse the red curtains above but I wanted to photograph in an open window and the open patio doorway on a rather wet wintry afternoon had to suffice.  You'll see more detail in the next photos:

12.12

12.13
The top and side edges have been simply overlocked to finish and a top pocket formed to take a rod.
The piece is not completed as the bottom edge has not been thought through properly - but I will talk through a further few ideas with Sian when I bring it to Farncombe in July.

One thing I am particularly pleased with is how the hanging moved in the breeze, seemed to go with the movement of the design, and that despite the felting thickness the hanging remains delicate.

12.14

Thursday, May 9, 2013

PAP3 samples

I've been trying out a few ideas of cutwork and lace for the background and edging of my PAP3 hanging.  These are sewn on silk organza and hand cut:

12.1
 It's not too clear from 12.1 but sections of the shapes have been cut away to give a shadow effect and colour shading
12.2
In 12.2 the top shape fabric was completely removed once the outline sewn then restabilised in a hoop and lace stitched on watersoluble fabric.  In the bottom shape only sections of the fabric were removed - a sort of broderie anglaise look.

12.3
In 12.3 I was looking at creating a staggered shape hanging in the gap, which I like and fits with my 'falling' shapes in the design.

I've also worked on some hand-dyed prefelt for the hanging, using an electric urn.

12.4
 I dyed some white prefelt a lichen / lime green using an ombre technique to get colour gradation. The wool is gradually pulled out of the pot over a wood block, then covered and steamed to set. You can see a sample of that in 12.5 below on the far right of the photo.  Then most of this prefelt was overdyed again using a dark blue acid dye again by the ombre technique (2nd from right in photo below) and directly in the pot having been shibori tied to retain areas of green (left of photo below)

12.5 dyed prefelt
12.6
A selection of tonal felts were similarly created from white using black acid dye (photo 12.6) to use in the black/white monotonal part of the design.  The colour variation within each piece was not as great as I had imagined (too much liquid in the pot so the dye dispersed and dyed fairly evenly) so I'll perhaps add wisps of wool roving to break up the colour or hand stitch after.


Saturday, April 27, 2013

Felt and lace do go together

Been working in the background on some samples for my PAP3 trying out some lace effects with my motif and thinking how to blend them with felt motifs.  Not so much success there as they still look blocky and clunky to me but will blog on them next week once I have something to show.
In the foreground I have been finishing a wearable jacket which employs felting and the lacework together:


The bodice uses tissue felting silk which I scrunch dyed (for want of a better description) in lilac and blue then nunofelted onto lilac merino roving with prefelt motifs in blue incorporated on top.  I drafted a fairly fitted pattern and then cut the pieces from the nunofelt and made up the jacket as in conventional dressmaking.  The jacket is fully lined and has a open end zip to make it a little contemporary.

The sleeves, apart from taking about 5 hours each to make (aargh),  are made from synthetic chiffon embroidered with a repeat pattern of my motif (yes, that motif again!) and the lacework achieved with a soldering iron.


I also made individual lace motifs from the chiffon to applique on to the felt from shoulder across the front of the jacket to tie the sleeves and bodice together so to speak.

I'm hoping that this piece will be part of a collection of wearable pieces for exhibition- a very small collection I suspect at this rate!

Now back to those samples....

Wednesday, February 27, 2013

I'm seeing this shape in my sleep...

I grabbed the chance while the sun was vaguely out this afternoon  to take some shots of my finished wearable that I mentioned in my last post.  I don't know if the work has helped me sort out some technical issues for my PAP but I'm pleased with the results in this piece.
front view
back view
The bodice uses individually cut motifs from collaged fabric backed with batting to give some dimension, layered with chiffon lacework motifs and chiffon rouleaux.  I have to admit I underestimated how long it would take to sew each motif on by hand, but it was the only way to allow the motifs to intertwine with each other as I stitched.

bodice detail
bodice detail2
The dress / tunic is double layered so that I could layer the motif edging but allow for other shadows and shapes to form as the 2 fabrics moved independently.


Monday, May 14, 2012

Metallic Assessment piece

My thoughts / inspiration for this second PAP came from the faces and design work in chapter 12 of module 2, and my penchant for lace and cutwork.  I originally wanted to do a hanging of some kind largely using metal shim, to create a posterized mosaic portrait of metal fragments set in lace.


I liked my initial attempts at creating a mosaic

but found difficulty in both producing a large enough range of different metal tones providing enough detail with the size of the metal pieces.  As Sian pointed out either my pieces had to be very small (which might mean the appearance of metal might be lost among the lace) or the hanging would be need to be very large.

I rethought things and decided to stay with the mosaic idea but incorporate it as lace into a wearable garment with recurring faces appearing in sections of the garment.

The very bad sketch on the left shows a basic corset construction for the bodice which will have lacings down each side, (one real for garment to get on and off).  Details of the straps are undecided at present.
The side panels will have metal shim shapes attached in a mosaic effect, while the centre front and back panels will have the 'faces' feature in metal shim and embroidery.

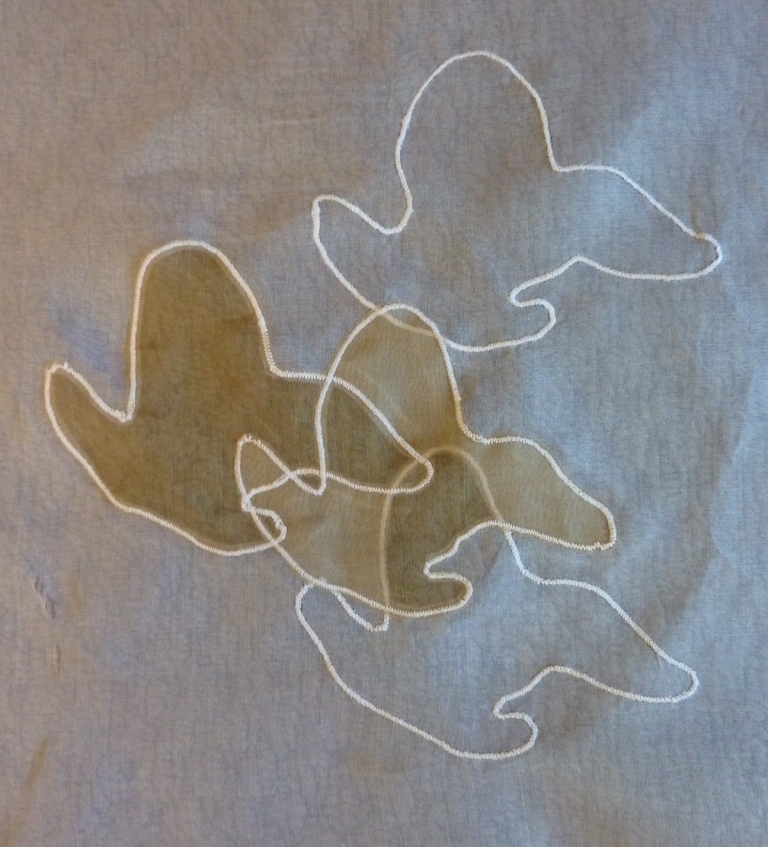
The volume and length of the skirt I am undecided about but I want it to exist in layers of translucent fabric so that I can have faces embroidered and cut out in different layers, all seen overlapping together.

At the top of the skirt will be a lacework of metal shim fragments in 3 or 4 sections but each will be unattached to the fabric layer beneath it.

I began by preparing my copper shim (acquired from Art Van Go in the UK thanks to my 2nd prize in the sketchbook competition).  I didn't want it looking obviously like copper so I patinated it to a dark auburn /almost black surface using liver of sulphur gel.


The mosaic shape I chose was a stylised facial profile, at least with a nose and mouth on both edges of the shape (not too obvious in this photo I have to admit).
I decided to use natural dyes to create a subtle colour palette of fabrics that I might need, so used dried eucalypt leaves, boiling about 300g in a mesh bag in about 6l water for an hour.  I added a couple of teaspoons of ferrous sulphate as mordant, as I wanted a dark metallic tinge to the colour rather than too bright.  I removed the bag of leaves and added the fabrics, cotton first before the silk ones, simmering for a further 30mins.


The resulting fabrics and threads - ochre to grey:


To cut a long story short, I've made most of the bodice to date:


The free machining to attach the metal shim mosaic is done in metallic thread in a crisscross fashion like lacing.  The background fabric is dyed silk dupion. The corset has a fairly stiff thickish batting (used in bag making) backed to the fabric, to give it structure.

The front panel shows a posterized image printed on dyed cotton scrim (bottom left) with some surface embroidery, more embroidered faces in metallic and white thread and the main image in metal shim and cut organza sheer.  The faces and images are all from my own photos.
The back panel is similar to this with different images.

More will follow hopefully.....


Friday, June 24, 2011

More for the exhibition...

As promised in the last post I finally finished my felted wrap for the NSCG exhibition which have some distinct similarites to my 'fishy' bag..


The silk georgette was hand dyed to match the felt and holes were made in the felted ruffles to tie in with the embroidered bubbles around the lace fish.

The exhibition has still 3 days to run and there are some amazing pieces from textile, glass, wood and ceramic artiists.   As they say "come on down!" and see for yourself.

Friday, June 17, 2011

Too many artists spoil the sewing machine!

Our house has been a flurry of activity recently with my daughter's major Art and Design work for HSC due today and the North Shore Craft Group exhibition and sale coming up this week.

I had hoped to put up some photos of Lorna's work but she's keeping it under wraps until her school's exhibition on Monday.  She is majoring in printing - screen and lino - and her presentation is a mixture of wall prints and a wearable sculpture in the form of a hand printed coat made from white denim paper that she made herself.  It's inspired by the work of Munch who was often photographed in a gabardine trenchcoat hence the connection.  I also like to think that I inspired the lacework and embroidery she prepared throughout the material to link her prints symbolize the connection she feels with Munch, but Lorna is her own artist on that and makes her own choices!

So while the machine was free (albeit covered in black ink and powder and required constant oiling, you sense my slight frustration!) I was allowed to use it and work on my pieces for my exhibition.
Suffice to say I'm still working on my second challenge piece - so photos will be following.   Hey, this is turning into a very boring post, so here's some colour - details of the exhibition at least, for those in the area.


The challenge this year has a Zodiac theme.  Since I'm a Piscean I selected fish as my embellishing theme and created a bag (of course) with lace embelllishment.  The bag fabric (under the lace overlay) is felted with sheers embellished into it and ebroidered.  This first piece was finished quite a while ago as I entered it into the Royal Easter Show in Sydney this Easter and was chuffed to win 1st prize.


Feeling slightly guilty that I was re-using the bag in this June exhibition I decided to make a coordinating felted shawl / wrap with the same fish embellishments in lace cutwork.  But as I say it still needs finishing this weekend.  Despite my planning I always seem to work up to the last minute...but I'm sure I'm not alone there.....

Wednesday, June 2, 2010

Dress embellishment

I did a little more work on the embellishment of my 3D item for the diploma, by manipulating and stitching the motifs into flower-like arrangements on the bodice. I made motifs out of the various sheers, pink, red and green and also simply out of thread (although the lace ones are not really apparent from the photos - believe me they are there!). The sheers had varying translucency that helped give depth to the layers.
In the process of making the motifs, after dissolving away the Solvy layer I dried some over bottle caps so that they remained curled and gave more dimension to the flimsy material.

The tendrils are made from overlocked thread lengths and dyed gauze strips cut and edged on the bias to give the curl. Within the motif arrangments, the tendrils could be threaded through the holes in some of the shapes which was an interesting plantlike effect.

The motifs continue on the back at the end of the strap. I didn't feel the need to add more to the strap itself as with more coverage the strap began to take over!


Friday, September 25, 2009

Red sky in the morning.....

As some of you might have read in your papers, we woke up on Wednesday to this in Sydney. Well, not exactly this view 'cos I live overlooking the bush, but just as orange a sight. I've never seen anything like it, very spooky indeed!

My camera was without battery of course so I couldn't get my own photos but it changed from this red to orange to yellow as the day went on. My son, never slow to spot an opportunity, chose to tell me that some schools were closed for the day but apart from endless red dust still everywhere, it wasn't too bad.
However, I decided to stay indoors for the day (what a great excuse) and get on with some sewing. After comments from Sian I've been playing around with my lacework trying to see how I can create a complete piece of "fabric" out of the shapes to use in my dress, or at least how big a piece is manageable. I got somewhat sidetracked of course and played intially with a scarf length piece of chiffon which evolved into this:


and then this clutch bag where the chiffon was directly sewn onto the black silk then remaining chiffon soldered out. I did some further outlines after to give more interest.


I did another scarf in purple using connecting swirls.

Now to get back to the patterns I should be working on..